In the first installment of the AI-controlled robot series, Dad, a senior Horizon programmer, used the TogetherROS software stack, Horizon’s robotics development platform, to build a gesture-controlled robot.
When the children’s friends are still wearing gloves or using remote control to direct the robot to run, gesture control of such an AI robot makes the children proud for a long time. (Click to review)
However, the good times did not last long, and the children were fond of the new and tired of the old toys, which gave me a new demand, showing the potential of product manager at a young age.
“Can the robot run after me, just like our dog does?”
In order to reflect the father’s powerful, the human body must follow the robot (in fact, it is the rich algorithm in the robot development platform that makes me so confident).
First, function introduction
Let’s take a look at the final functionality.
From the following effect, when the human moves, the robot can quickly follow the human. Thanks to the 5Tops computing power on Horizon Rising Sun ®️ X3pi (hereinafter referred to as X3pi), the BPU can achieve low latency (about 30ms), high frame rate (30fps at full frame), long distance (>8m), and low system load (the 4-core CPU only occupies <40% of the single core).
Before starting the code, let’s briefly analyze what basic modules the human body following robot needs to have.
sense
For vision-based AI algorithm applications such as human body following, visual sensors are first needed to capture image data.
perception
After the image released by the sensor is obtained, the visual algorithm is used to reason, detect the human body, and realize the ability of perception.
interaction
After the human body is detected, functional applications corresponding to different human body detection results need to be defined and implemented, such as the human body on the right side of the robot needs to control the robot to turn to the right.
Controls
According to the control command output of the “interactive” module, the mechanical control of the robot is realized.
Robot body
Of course, a robot body with motion ability is also needed to receive control instructions and control motor movement to achieve the final robot to follow the human body.
The Horizon robotics platform TogetherROS software stack comes with a rich, easy-to-use robotics development package that includes all the functional building blocks needed to build an intelligent robot application, such as human follow-through robots and phase 1 robotic gesture control, completely open source and free, and allows developers to redevelop and get started.
2. Preparation
Prepare the hardware equipment and software package to build the robot human body to follow the application case.
hardware
Hardware includes:
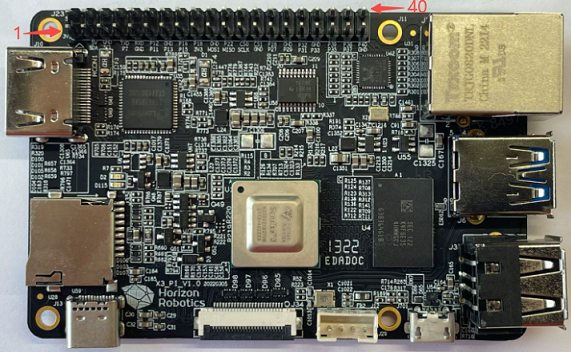
①X3 faction
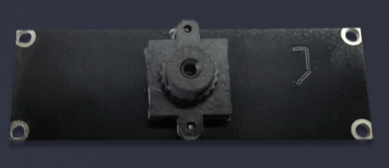
②F37 MIPI Sensor
③ Robot
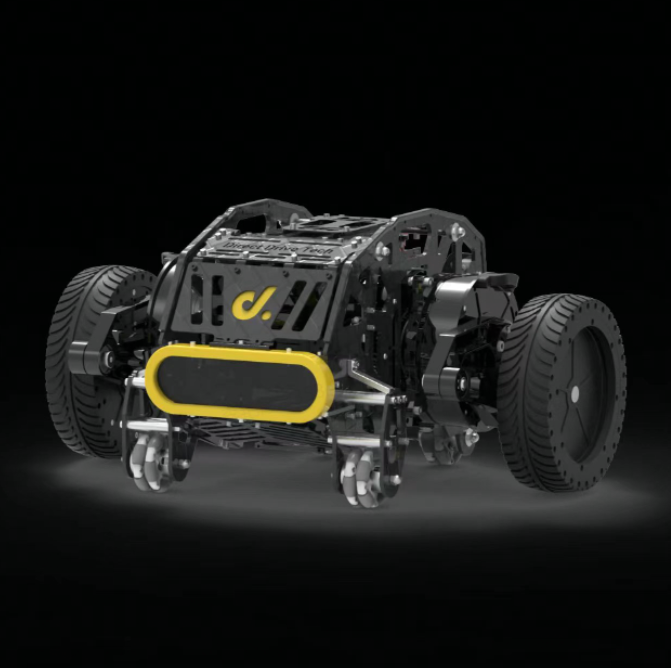
X3 and TogetherROS match the original biped robot and Little R Tech’s wheatwheel car. Here in order to let the child feel that the robot is tall enough, use the wheel foot robot at the end of the introduction, no students do not have to worry, the article will introduce their own way to build the robot.
④ Other accessories
A.sb Type C Interface power cable. At least with 5V@2A adapter for X3 power supply.
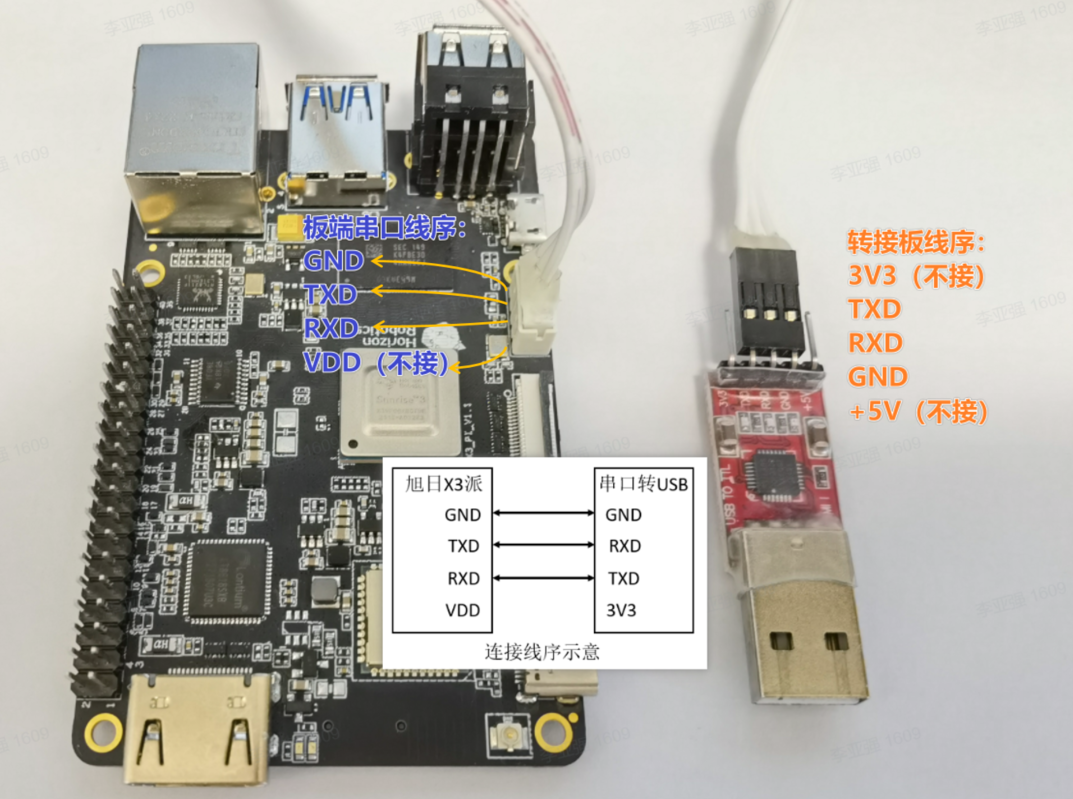
b. The serial cable is connected in the following ways:
C.f memory card and card reader. The X3PI development board uses TF memory card as the system boot medium, and it is recommended to use TF memory card with a capacity of at least 8GB and a rate of C10 or more, in order to meet the storage space requirements of Ubuntu system and more application function packages.
Installation system
Refer to the installation system chapter of the Asahi X3 dispatch user manual, after the installation is complete (or has been installed), you need to update the system.
System configuration
To configure the wireless network of the X3 PI, refer to the wireless network section of the X3 PI user manual.
After the wireless network is configured successfully, query the IP address:
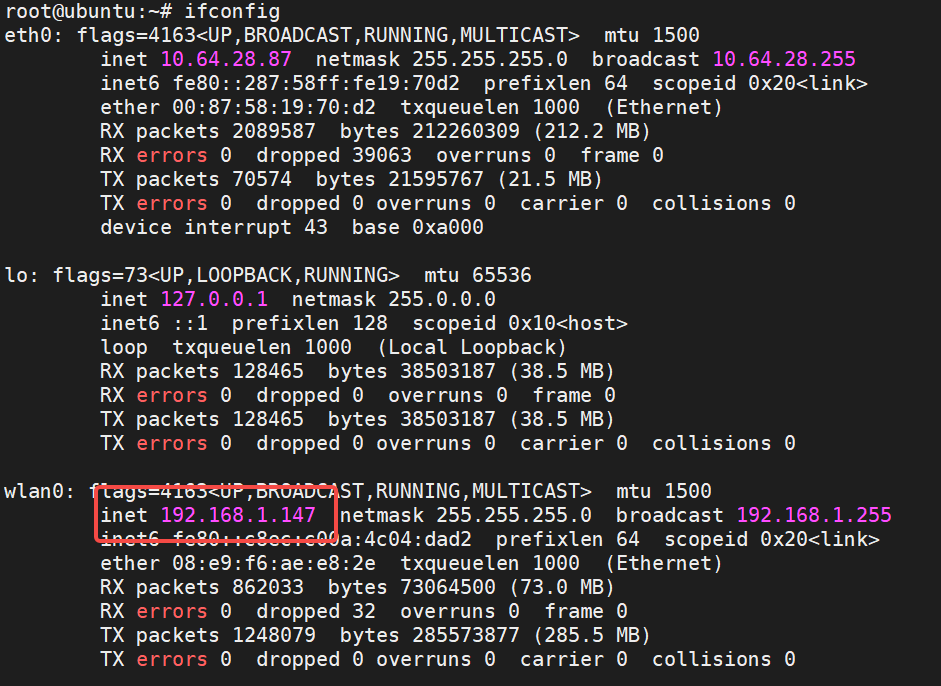
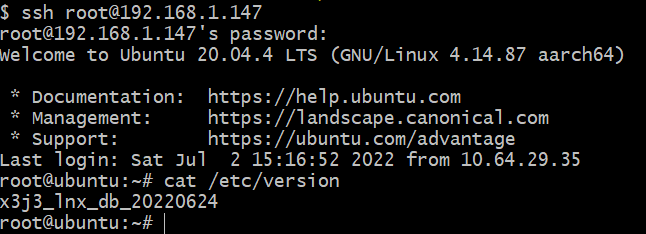
As you can see, the IP address assigned to the wireless network of dispatch X3 is 192.168.1.147. Below, use this address and root account (password is root) to remotely connect to dispatch X3 through ssh. After successful login, the status is as follows:
Test human detection algorithms and interactive functions
X3 sends a terminal to open the script for human detection and control:
source /opt/tros/setup.bash

cp -r /opt/tros/lib/mono2d_body_detection/config/ .

ros2 launch body_tracking hobot_body_tracking_without_gesture.launch.py
After the startup is successful, when a human body appears in front of the F37 camera, the terminal output the following information:
[body_tracking-5] [INFO] [1657615485.941625685] [TrackingManager]: track_id: 1, frame_ts: 485910, tracking_sta(0:INITING, 1:TRACKING, 2:LOST): 1, gesture: 0, y pixel to robot: 2, present_rect: 540 6 954 542
[body_tracking-5] [INFO] [1657615485.941724902] [TrackingManager]: UpdateTrackAngle: frame_ts: 485910, track_id: 1, angel_with_robot: 45
[body_tracking-5] [INFO] [1657615485.942362166] [TrackingManager]: rotate direction: 0, step: 0.500000
[body_tracking-5] [WARN] [1657615485.942528139] [RobotCmdVelNode]: RobotCtl, angular: 0 0 -0.5, linear: 0 0 0, pub twist ts: 1657615485942515
The above log shows that the robot is following the human body (tracking_sta: 1) The human body is not directly in front of the robot, and the Angle between the robot and the robot is 45 degrees. Following the interaction module, the robot rotates in the direction of the human body at a speed of 0.5r/s (rotate direction: 0, step: 0.500000). On the PC side, the browser will render and display the images captured by the camera in real time, the detection frame and target number results of human body, human head, human face and human hand, the key points of human skeleton and real-time performance statistics, as shown in the figure below:
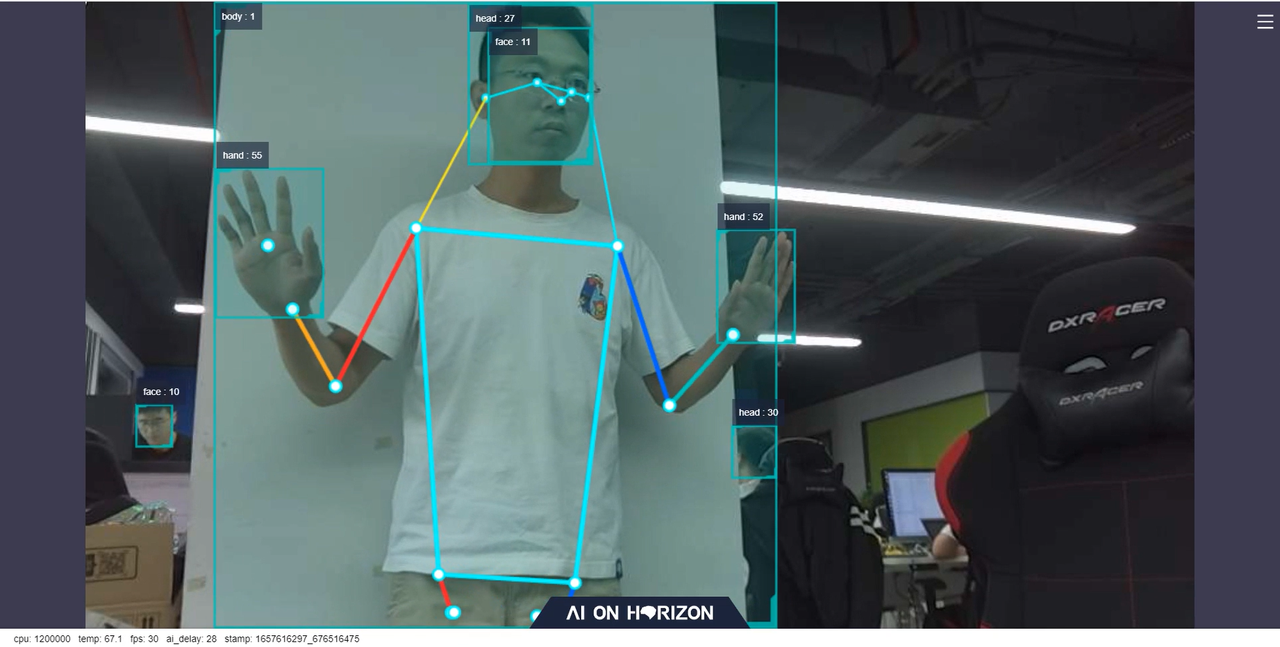
The fps displayed at the bottom of the browser is the frame rate of the real-time AI inference output, which is consistent with the frame rate of 30fps of the image captured by the F37 camera. ai_delay (in milliseconds) is 28, which represents the delay of single-frame inference. It starts from the release of image data by sensor Node and takes time to release AI msg containing human detection results after inference by sensing algorithm Node. Run the top command on the board to check the system resource usage, as shown in the following figure. mono2d_body_detection indicates a human body detection algorithm inference process, and the CPU usage is 38.9%.

The above tests show that TogetherROS 'human body detection algorithm is running successfully on the X3, and that the algorithm can achieve low latency (30ms), high frame rate (30fps at full frame), long distance (>8m), and low system load (single-core CPU occupancy <40%), reflecting the powerful computing power of the X3 BPU.
After the human detection algorithm is tested, the following function of the human body is tested. Pick up another terminal on X3 and run the following command to query the topic list on X3:
source /opt/tros/setup.bash

ros2 topic list
outputs
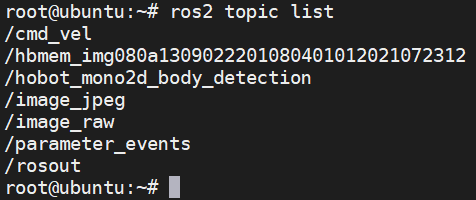
Where the /cmd_vel topic is the control command message issued by the human body following the control node. Run the ros2 topic echo /cmd_vel command on the current terminal to query the topic information on the X3 dispatch. When the human body appears in front of the F37 camera and deviates from the front, the terminal output is as follows:
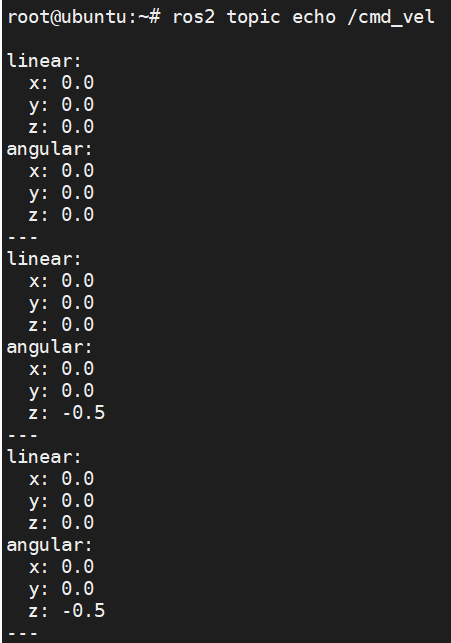
You can see that at this time, the angular z data of the /cmd_vel topic published by the human body following the control node is -0.5, indicating rotation at a speed of 0.5r/s. The software package for the human body recognition algorithm and interaction function has been installed successfully, and the robot motion control message can be posted on the /cmd_vel topic.
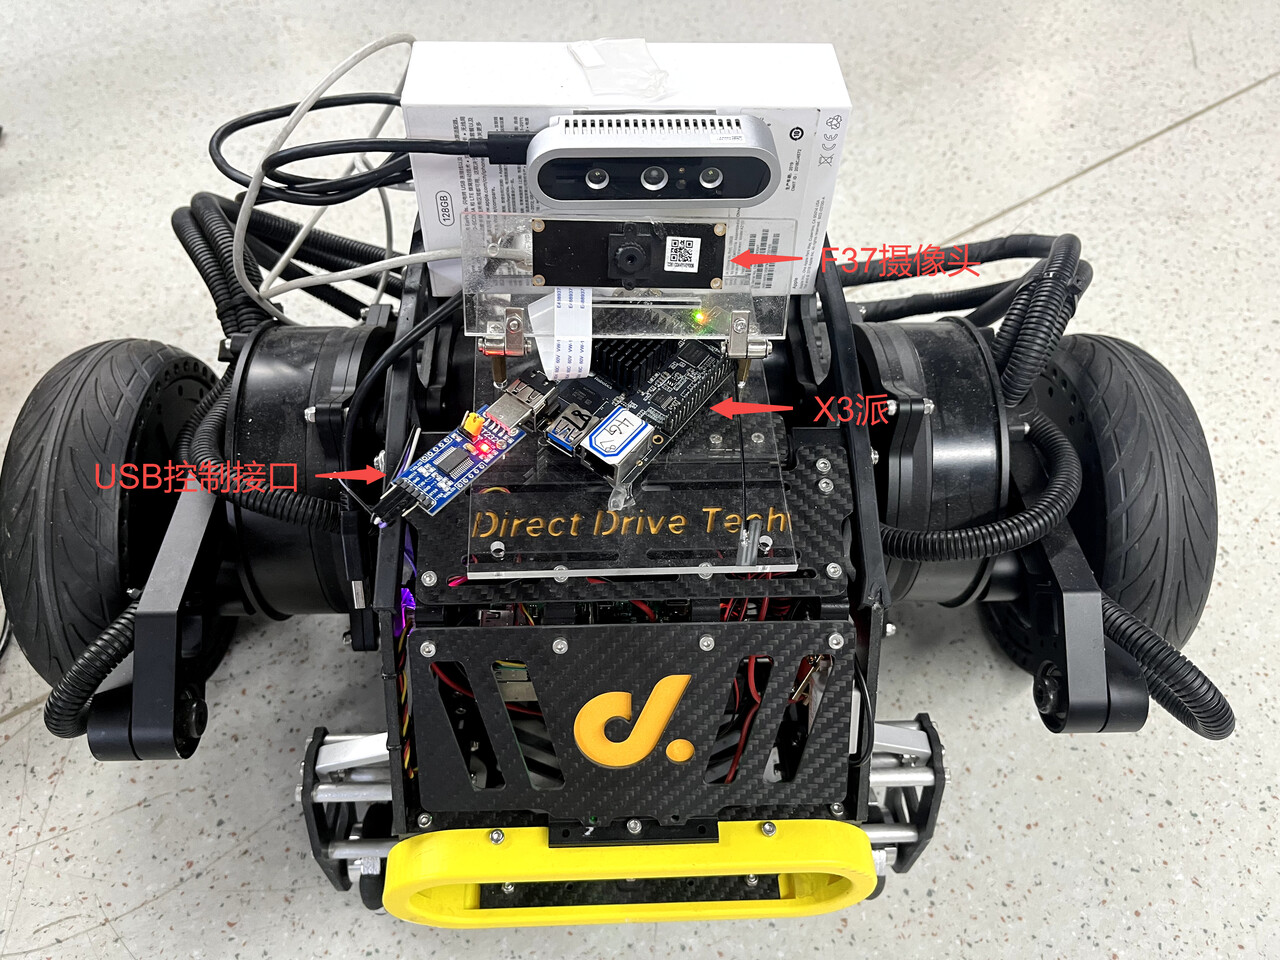
Install the X3 pie on the robot
Install the X3 pie on the robot and test the ability to control the robot’s movement on the X3 pie via the publish /cmd_vel topic. The X3 pie connected to the F37 camera is directly fixed to the robot, and the robot’s USB control interface is plugged into the X3 pie. The installation effect is as follows:
For ROS-enabled robots, a ROs-based robot motion control Node (geometry_msgs/msg/Twist) is typically provided with the function of subscribing to the /cmd_vel topic control message (the robot control message defined in ROS2 of the message type (geometry_msgs/ MSG/twist). The motion control command is sent to the robot through USB interface to realize the purpose of controlling the robot motion.
The local biped robot used in this paper uses a USB interface, and provides a motion control package running on the X3 pie. After the package subscribs to the control message of /cmd_vel topic, it sends control commands to the robot through USB to realize the control of the robot. Start the local and final biped robot operation control Node on the X3 pie. Open a terminal and run the following command:
source /opt/tros/setup.bash
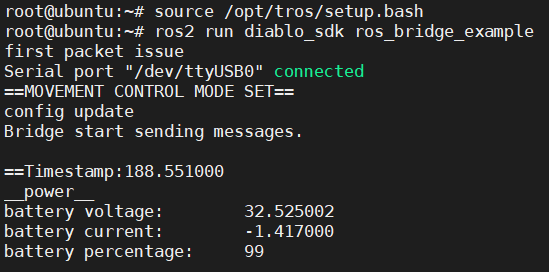
ros2 run diablo_sdk ros_bridge_example
After the command is successfully executed, the following information is displayed:
X3 switches on a terminal and controls the robot to rotate at 0.3r/s by publishing /cmd_vel topic messages:
source /opt/tros/setup.bash

ros2 topic pub -r 10 /cmd_vel geometry_msgs/Twist '{linear: {x: 0, y: 0, z: 0}, angular: {x: 0, y: 0, z: 0.3}}'
After the command is successfully executed, the following information is displayed:

The effect of robot rotation after receiving the control command is as follows:

It indicates that the robot can move correctly according to the issued control command message.
How should other robots be installed
If you have other mobile robots in your hand, such as a robot using Raspberry PI or Jetson Nano as the upper computer, you can also install X3 PI on the robot to replace the Raspberry PI or Jetson Nano to control the robot movement. The installation method is as follows:
① Compile the motion control package that can run on the X3 pie;
a.X3 Install ROS2 software system building and compilation tools:
apt update
apt-get install python3-catkin-pkg
pip3 install empy
pip3 install -U colcon-common-extensions
b. Copy the robot motion control ROS2 package source code originally running on the Raspberry PI or Jetson Nano to the X3 PI;
c. On X3, directly use source /opt/tros/setup.bash under the path where the package source code project is located; The colcon build command compiles the package.
d. If the original motion control package is based on ROS1 development, the source code needs to be adapted to ROS2. Only the subscription and processing of the “cmd_vel” topic messages need to be adapted, and if there are other features in the original ROS1 package, you can ignore them for now.
② Installation
a. Fix X3 PI on the robot. If space is limited, the original Raspberry PI or Jetson Nano can be removed;
b. Use USB Type C to power X3. If there is no Type C power output on the robot, you can also use mobile power supply (output at least 5V& DC 2A) to power X3.
c. Plug the USB control interface of the robot into the X3 pie.
③ Test
a.X3 launch the newly compiled robot motion control package;
b.X3 switch on a terminal and control the robot to rotate at 0.3r/s by Posting /cmd_vel topic message:
source /opt/tros/setup.bash

ros2 topic pub -r 10 /cmd_vel geometry_msgs/Twist '{linear: {x: 0, y: 0, z: 0}, angular: {x: 0, y: 0, z: 0.3}}'
If the robot rotates normally, it indicates that the X3 pie has been successfully installed.
4. Complete robot human body following effect
Let’s start testing the full robot body following function.
X3 sends a terminal to start the human detection and control script
source /opt/tros/setup.bash

cp -r /opt/tros/lib/mono2d_body_detection/config/ .

ros2 launch body_tracking hobot_body_tracking_without_gesture.launch.py
X3 sends a terminal to open and start the robot motion control Node
source /opt/tros/setup.bash

ros2 run diablo_sdk ros_bridge_example
Robots move with people
5. Principle analysis
In Chapter 4, the script hobot_body_tracking_without_gesturing.launch.py and the motion control Node are respectively launched in the two terminals of X3 to realize the effect that the robot follows the human body. This chapter analyzes the implementation principle.
Node and Topic information when the App is running
For a Ros-based App, the first thing to think about is which nodes are running the App, which topics are published and subscribed by these nodes, and the relationships between these nodes.
Use the command line tool of ros2 on X3 pai to query the Node and Topic information running on the device:
root@ubuntu:~# source /opt/tros/setup.bash
root@ubuntu:~# ros2 node list
/ai_msg_sub_node
/hobot_codec1658324595406906403
/horizon_tracking_RobotCmdVel
/mipi_cam
/mono2d_body_det
/ros_bridge_example
/tracking_strategy_parameter_node
/transform_listener_impl_5594bf54a0
/websocket
root@ubuntu:~# ros2 topic list
/cmd_vel
/hbmem_img080a1309022201080401012021072312
/hobot_mono2d_body_detection
/image_jpeg
/image_raw
/imu/data_raw
/odom
/parameter_events
/quat_odom
/raw_odom
/rosout
/tf
/tf_static
It is found that there are multiple nodes running on the X3 Node. These ROS2 nodes communicate with each other based on pub&sub mechanism. These nodes are connected in series through topic to form a pipeline.
There is a lot of Node and Topic information when this App is running, and the association between nodes cannot be seen. The Node Graph function of rqt on PC (the PC needs to install ROS2 Foxy version, rqt, and the PC needs to be in the same network segment as X3pi) can visually display the nodes running on X3pi, the topics published and subscribed by Node, and the connection relationships between nodes. The following figure (where the Node name is in the oval box and the topic name is in the rectangular box) :

It can be seen that the whole graph (pipeline) starts from mipi_cam Node (image collection and publication), and ends with websocket Node (serializing pictures and AI results for visual display) and ros_bridge_example Node (robot motion control). Multiple nodes are connected between the start and end points. The ros_bridge_example Node in these nodes is started by the ros2 run diablo_sdk ros_bridge_example command. The remaining nodes are started using the hobot_body_tracking_without_gesture.launch.py script.
Note: The /hobot_mono2d_body_detection topic messages received by the /ai_msg_sub_node node are actually processed by the /horizon_tracking_RobotCmdVel node. As a result, the graph displayed is discontinuous, which is a design problem to be improved
App Node introduction
For complex applications containing multiple nodes, ROS2 provides the ability to launch nodes in batches using a launch script.
The robot follows the human App to launch these nodes using the hobot_body_tracking_without_gestus.launch. py script, which reads as follows:
import os

from launch import LaunchDescription
from launch_ros.actions import Node

from launch.actions import IncludeLaunchDescription
from launch.launch_description_sources import PythonLaunchDescriptionSource
from ament_index_python import get_package_share_directory

def generate_launch_description():
    web_service_launch_include = IncludeLaunchDescription(
        PythonLaunchDescriptionSource(
            os.path.join(
                get_package_share_directory('websocket'),
                'launch/hobot_websocket_service.launch.py'))
    )

    return LaunchDescription([
        web_service_launch_include,
        Node(
            package='mipi_cam',
            executable='mipi_cam',
            output='screen',
            parameters=[
                {"out_format": "nv12"},
                {"image_width": 960},
                {"image_height": 544},
                {"io_method": "shared_mem"},
                {"video_device": "F37"}
            ],
            arguments=['--ros-args', '--log-level', 'error']
        ),
        Node(
            package='hobot_codec',
            executable='hobot_codec_republish',
            output='screen',
            parameters=[
                {"channel": 1},
                {"in_mode": "shared_mem"},
                {"in_format": "nv12"},
                {"out_mode": "ros"},
                {"out_format": "jpeg"},
                {"sub_topic": "/hbmem_img"},
                {"pub_topic": "/image_jpeg"}
            ],
            arguments=['--ros-args', '--log-level', 'error']
        ),
        Node(
            package='mono2d_body_detection',
            executable='mono2d_body_detection',
            output='screen',
            parameters=[
                {"ai_msg_pub_topic_name": "/hobot_mono2d_body_detection"}
            ],
            arguments=['--ros-args', '--log-level', 'error']
        ),
        Node(
            package='websocket',
            executable='websocket',
            output='screen',
            parameters=[
                {"image_topic": "/image_jpeg"},
                {"image_type": "mjpeg"},
                {"smart_topic": "/hobot_mono2d_body_detection"}
            ],
            arguments=['--ros-args', '--log-level', 'error']
        ),
        Node(
            package='body_tracking',
            executable='body_tracking',
            output='screen',
            parameters=[
                {"ai_msg_sub_topic_name": "/hobot_mono2d_body_detection"},
                {"activate_wakeup_gesture": 0},
                {"img_width": 960},
                {"img_height": 544},
                {"track_serial_lost_num_thr": 30},
                {"move_step": 0.5},
                {"rotate_step": 0.5},
                {"activate_robot_move_thr": 5}
            ],
            arguments=['--ros-args', '--log-level', 'info']
        )
    ])
Multiple nodes are specified in the script. The package configuration item in each Node indicates the Node name. You can see that the Node name configured in the script is consistent with that found in section 5.1.
In Chapter 1, the functional modules required for the robot body following App are analyzed. Node is analyzed in accordance with these functional modules.
sense
Use mipi_cam Node from the TogetherROS Hobot Sensor component and specify parameters for Node:
“out_format” : The image format is “nv12”.
“image_width” : The image resolution width is 960
“image_height” : The image resolution is 544
“io_method” : The published image transmission mode is “shared_mem”, that is, the shared memory mode. The corresponding topic of the message is “hbmem_img”.
“video_device” : specifies the MIPI camera type to be used as “F37”, indicating an F37 camera
The parameter specifies that using the F37 camera, the published image format and resolution can be directly used for algorithmic inference, where the image is published by shared memory, which can greatly reduce the system load and transmission delay.
perception
Using the Boxs algorithm in TogetherROS for human detection and tracking algorithms, subscribing to image messages published by Hobot Sensor (mipi_cam Node), and using BPU processors for AI inference, AI msg containing human body, human head, human face, human hand frame and human bone key point detection results are released, and multi-target tracking (MOT) function is used to track detection frame and assign target number.
Node corresponds to the package name ‘mono2d_body_detection’, and specifies the parameters of Node:
“ai_msg_pub_topic_name” : “/hobot_mono2d_body_detection” is the name of the topic for publishing AI perception results containing human body detection frame information.
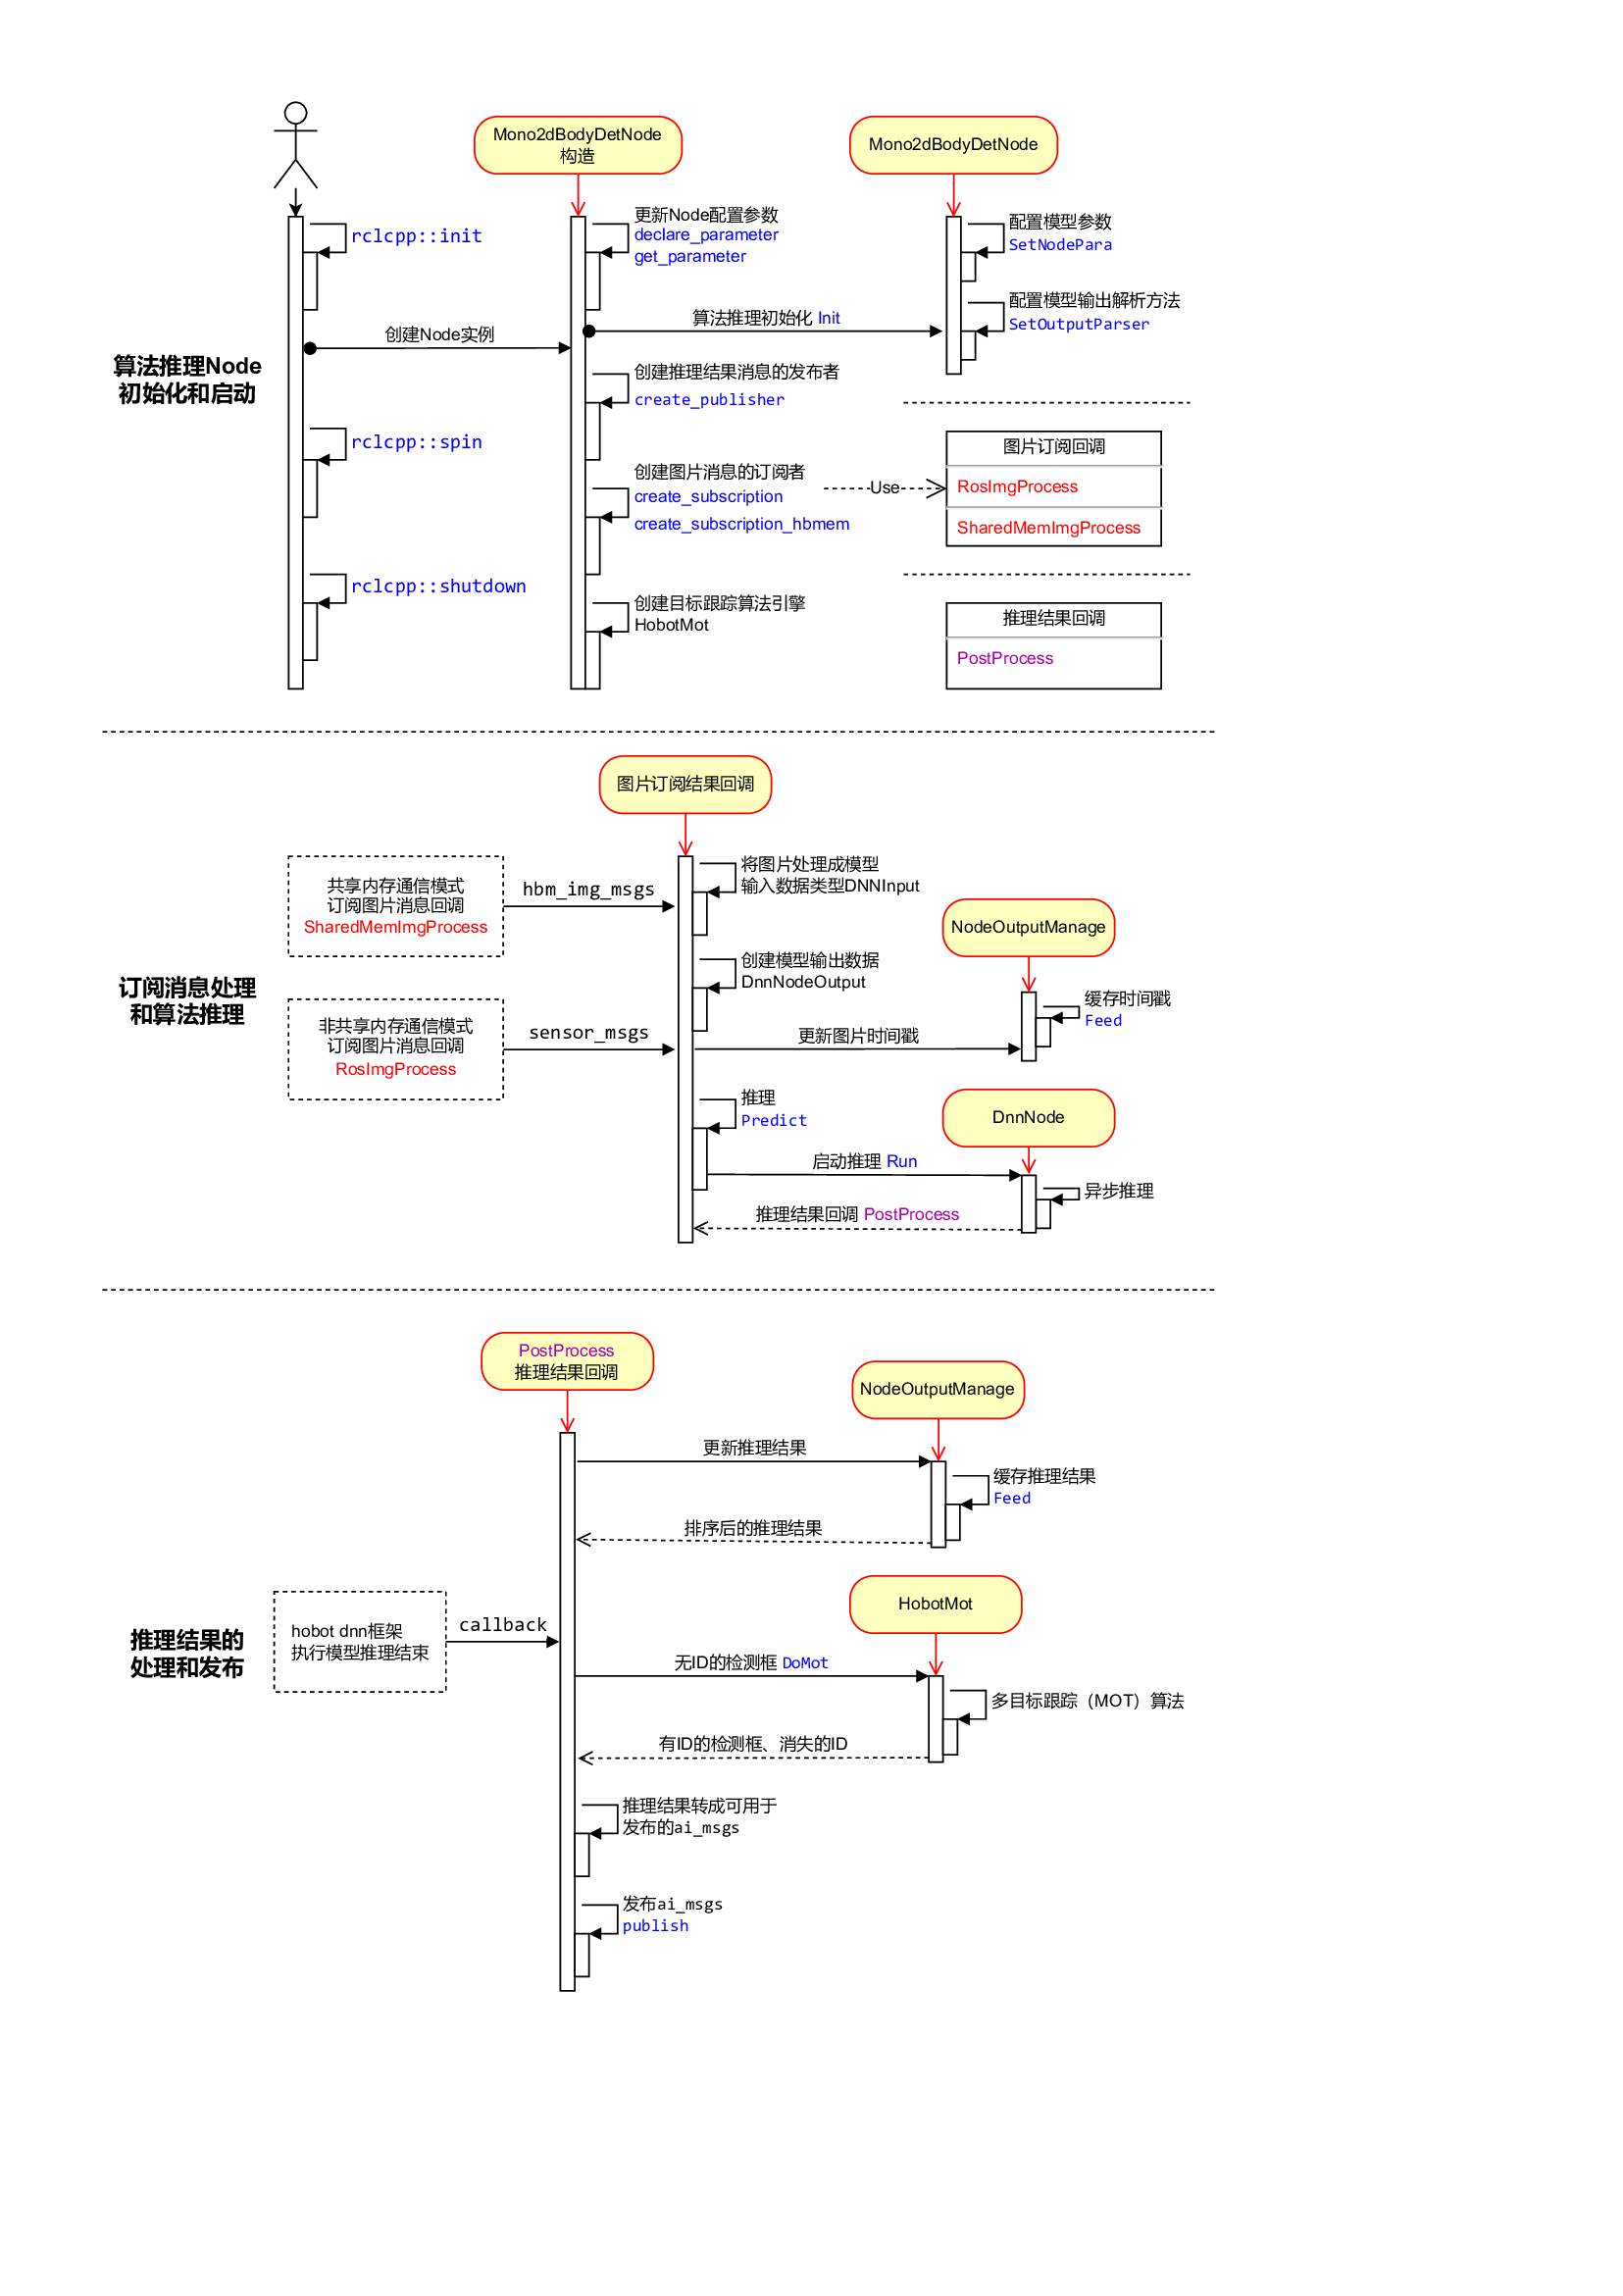
The Human Body Detection and Tracking Algorithm Inference Node (Mono2dBodyDetNode) mainly consists of three logically independent functions:
Node initialization and startup
Configure the model information used by the algorithm, create the publisher and subscriber of the message, and start the target tracking algorithm engine;
Subscribe to messages and algorithmic reasoning
In the registered image message callback, the image data is processed and used for the algorithm model inference, without waiting for the algorithm inference to complete;
Processing and publication of inference results
After the algorithm inference is completed, the inference result is output through the registered callback PostProcess. The detection result is sorted in time order (NodeOutputManage) in the callback and processed by the multi-target tracking algorithm (HobotMot). Then the algorithm inference result message is published.
The design and flow logic of Node are as follows:
interaction
The human body following strategy Node subscribes to the AI msg containing human body information published by the human body detection and tracking algorithm, and releases control messages of forward, backward, left and right turn according to the position relationship between the human body frame and the robot, so as to control the robot movement. The motion control message published by Node is the one defined in ROS2. The topic is “/cmd_vel” and the message type is “geometry_msgs/msg/Twist”. The package name of Node corresponds to ‘body_tracking’ and specifies the parameters of Node:
“ai_msg_sub_topic_name”: Subscribe to the topic name" /hobot_mono2d_body_detection" that contains human body detection information.
“activate_wakeup_gesture”: Turn on the wake gesture. A value of 0 indicates that the wake gesture is not enabled. Generally, in a scene with a large number of people and a complex environment, the wake up gesture can be enabled to avoid triggering the human body following function by mistake.
“img_width”: indicates the width of pixels in the input image of the human body detection model
“img_height”: indicates the height of the pixel in the input image of the human body detection model
track_serial_lost_num_thr: indicates the threshold for the number of consecutive frames lost by the human body. The value is 30. It indicates that the following body is selected again after the following body disappears for 30 consecutive frames
“move_step”: the step size (speed) of the translation movement, 0.5 indicates that the moving speed is 0.5m/s, the larger the value, the faster the speed
“rotate_step”: the step size (speed) of the rotation movement, 0.5 indicates that the rotation speed is 0.5r/s, the higher the value, the faster the speed
“activate_robot_move_thr”: threshold for activating robot movement, in pixels. When the y pixel value of the human body detection box is less than the threshold (the upper boundary of the specific screen), the robot is activated to move.
The human body following strategy selects the human body that appears for the first time as the following body. If multiple human bodies appear at the same time, the human body detection box with the largest width is selected as the following body. In the case of a follower, other human test results are invalid. tracking_sta in the log output of Node indicates the tracking status. 0 indicates that the follower is not found, 1 indicates that the follower exists, and 2 indicates that the follower disappears. After Node starts, if no follower is found, the tracking_sta value in the output log is 0. When there is a follower, the value of tracking_sta in the log is 1, and the number of the follower is displayed using the track_id keyword. Only when the follower disappears, that is, the track_serial_lost_num_thr frame (set to 30 frames, 1 second for F37 camera with output frequency of 30fps) does not detect the follower, judges that the follower disappears, and starts to select the follower again. When the follower disappears, the tracking_sta value in the output log is 2.
If you need to enable the wake up gesture to avoid false triggering, see the code repository of the human body following strategy for details about how to use the wake up gesture.
Controls
The robot motion control Node subscribs to the control message whose topic is “/cmd_vel” published by the human body following policy Node. According to the control protocol, the robot motion control command is issued to the robot’s lower computer through the USB bus. For different types of robots, the control protocols are different, corresponding to different motion control nodes. This paper uses a local biped robot, and the corresponding motion control Node startup method is ros2 run diablo_sdk ros_bridge_example. This Node starts separately and is not in the startup script.
System design of App
According to the introduction of chapters 5.1 and 5.2, it has been known which nodes are started by the robot body following App, the functions of these nodes, the relationship between nodes, and how to use these nodes to achieve the goal of following robots through the human body. The following is a theoretical summary to introduce the system design of this App. For a complex robot system, the upper computer and the lower computer are generally configured on the robot. The upper computer of the robot has strong computing power, and can perform complex applications on the upper layer of the robot. At the same time, it can shield the underlying differences of different types of robots to the greatest extent. The robot lower machine generally uses a low-cost MCU processor to collect/control data of various sensors and hardware on the robot body.
The human body following App is composed of two parts, namely the robot and the PC side, in which the robot part is further divided into the upper computer and the lower computer. The detailed composition is as follows:
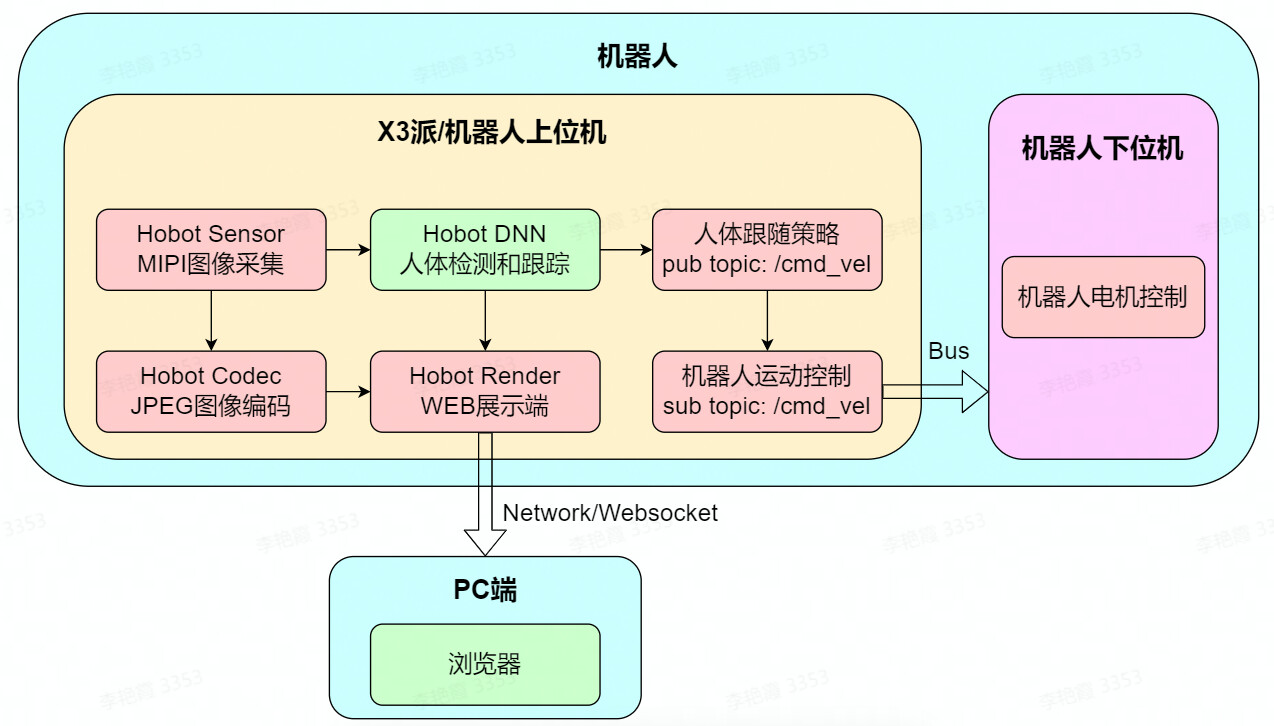
The upper computer of the robot is X3pi, running multiple ROS2 nodes. In addition to the sensing, perception, interaction and control functions described in Chapter 5.2, there are also JPEG image coding and WEB display functions, encoding and compressing pictures released by the camera. In addition, the AI data released by the human body detection and tracking algorithm is serialized and released using the websocket protocol to realize the rendering display and debugging on the PC side across devices (the robot lower machine belongs to a part of the robot body, the detailed description is omitted).
As you can see from the App’s system design drawing, the X3 and TogetherROS robots can use the chip’s AI acceleration capabilities and the abundance of TogetherROS algorithms and robot development components to quickly develop smart robot applications.
Vi. FAQ
How to reproduce the App effect?
Replicating the App effect involves two parts:
(1) The robot body follows the App
Refer to Chapter 2 for preparations to install TogetherROS on the X3 pie.
(2) The final biped robot and robot motion control package
Access methods can be found in the product information: https://developer.horizon.ai/forumDetail/94246984227025410
In addition to the biped robot, X3 and TogetherROS are also compatible with Little R Technology’s wheatwheel car, which can also be used to experience App effects directly.
Can I experience the App without a robot?
Can experience. In the absence of a robot, you can use this App to control virtual robot movement in the gazebo simulation environment.
How do I adapt the App to my robot?
In this paper, we take a bipedal robot as an example to describe the effect of human body following the App. The App does not depend on any form of the robot. The motion control message published by the App is the message defined in ROS2 (topic is “/cmd_vel” and message type is “geometry_msgs/msg/Twist”). For details refer to the principle analysis in Chapter 5).
As shown below, the composition of the App can be divided into two parts: red and blue dotted boxes:
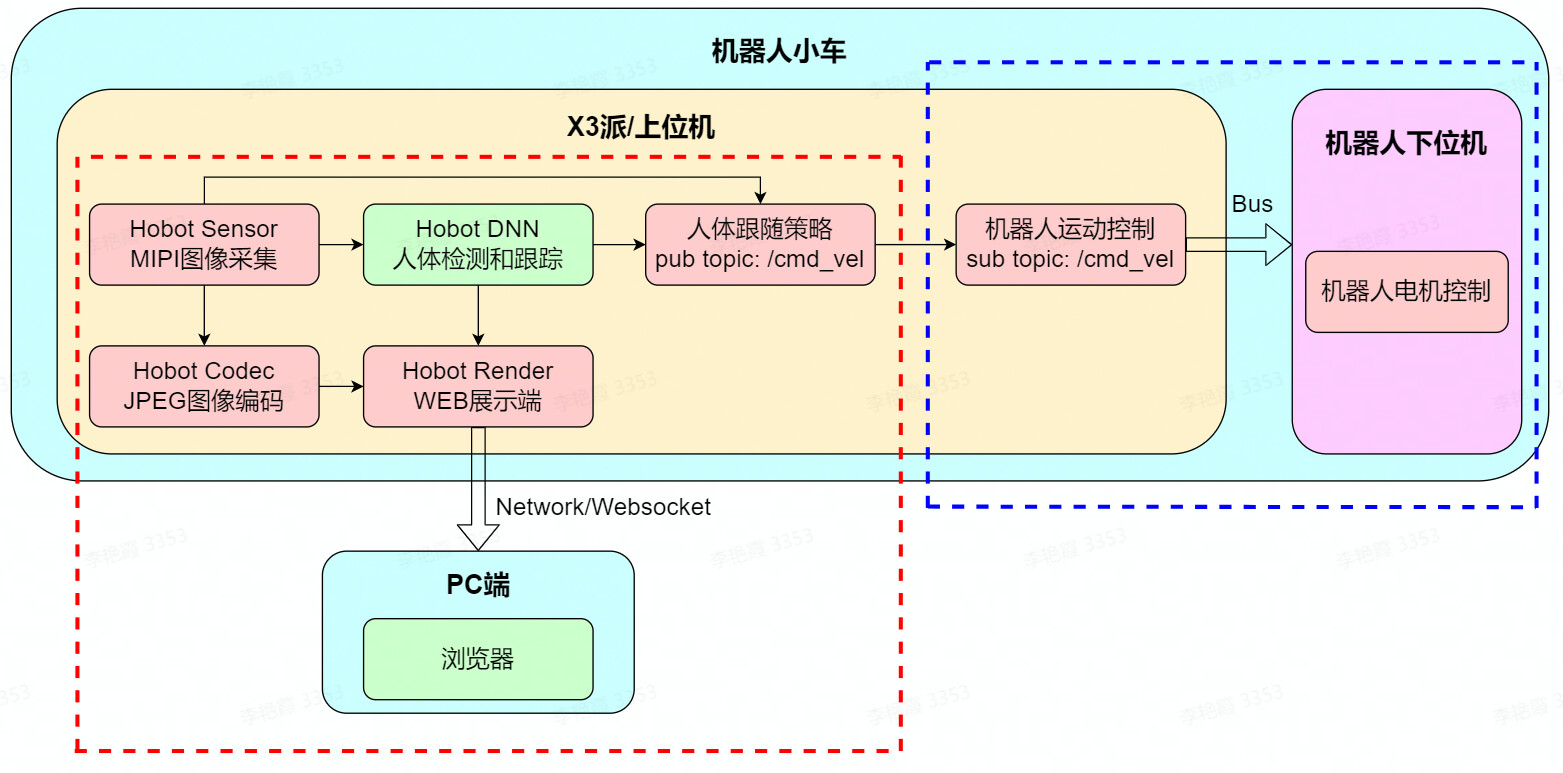
(1) Red dotted box
This part of the function does not depend on the robot, that is, it can be directly transplanted to any form of robot.
To install the X3 on the robot, install the camera sensor and TogetherROS on the X3 according to the preparation in Chapter 2.
(2) Blue dotted box
This part of the function depends on the robot, need targeted adaptation. According to the different state of the robot, the corresponding adaptation methods are different.
In state 1, there were upper and lower computers on the original robot. For example, Raspberry PI or Jetson Nano was used as the upper computer, and the upper computer had robot motion control Node. The robot motion control Node needs to be recompiled on the X3 pie.
In state 2, the original robot had only the lower machine. After developing robot motion control Node (refer to components/xrrobot · develop · HHP/app/xr_robot · GitLab (horizon.ai)), compile robot motion control Node on X3.
What cameras does the App support?
The App has no requirements for the camera type, and the Horizon robot platform supports both MIPI and USB cameras. For MIPI cameras, two models F37 and GC4663 are supported.
How to adjust the speed of the robot?
Modify the move_step and rotate_step parameters of the body tracking policy body_tracking Node in the App startup script hobot_body_tracking_without_gesting.launch. py. The translation and rotation speed of the robot can be controlled:
        Node(
            package='body_tracking',
            executable='body_tracking',
            output='screen',
            parameters=[
                {"ai_msg_sub_topic_name": "/hobot_mono2d_body_detection"},
                {"activate_wakeup_gesture": 0},
                {"img_width": 960},
                {"img_height": 544},
                {"track_serial_lost_num_thr": 30},
                {"move_step": 0.5},
                {"rotate_step": 0.5},
                {"activate_robot_move_thr": 5}
            ],
            arguments=['--ros-args', '--log-level', 'info']
        )
Can I develop a python Node extension App feature?
Yes, ROS2 supports cross-device, cross-platform, cross-language, and TogetherROS is fully compatible with the ROS2 Foxy version, so it also supports these features.
For example, based on the detected key points of human bones, interactive Node is developed to control the humanoid robot to imitate human body movements. Subscribe to hobot_mono2d_body_detection topic message (including key point information of human skeleton), use the command to query the topic details:
# ros2 topic info /hobot_mono2d_body_detection
Type: ai_msgs/msg/PerceptionTargets
Publisher count: 1
Subscription count: 1


import rclpy
from rclpy.node import Node

from ai_msgs.msg import PerceptionTargets

class MinimalSubscriber(Node):

    def __init__(self):
        super().__init__('minimal_subscriber')
        self.subscription = self.create_subscription(
            PerceptionTargets,
            'hobot_mono2d_body_detection',
            self.listener_callback,
            10)
        self.subscription  # prevent unused variable warning

    def listener_callback(self, msg):
        self.get_logger().info('I heard: "%s"\n' % msg)


def main(args=None):
    rclpy.init(args=args)

    minimal_subscriber = MinimalSubscriber()

    rclpy.spin(minimal_subscriber)

    # Destroy the node explicitly
    # (optional - otherwise it will be done automatically
    # when the garbage collector destroys the node object)
    minimal_subscriber.destroy_node()
    rclpy.shutdown()


if __name__ == '__main__':
    main()
After Node is developed in python, compile and run directly on the X3 pie. Run and output the subscribed message:
How to develop a Node algorithm to extend App functionality?
TogetherROS 'Hobot DNN simplifies on-board AI model reasoning and deployment, unleashing BPU computing power and lowering barriers to AI use. At the same time, the model post-processing of commonly used detection, classification and segmentation algorithms is built in to help users quickly integrate and deploy their own algorithms on the X3 pie.