Preface
This year, humanoid robots and robotic dogs have frequently emerged as hot topics. For such robots, motion control is undoubtedly one of the core technologies. As one of the main methods of current motion control, reinforcement learning can also fully leverage the advantages of RDK series boards in model inference. Therefore, we attempted to deploy reinforcement learning models on RDK S100 and explore their applications on practical robot platforms.
The experimental robot used in this experiment is the Go2 robotic dog from Unitree, and the inference equipment is the RDK S100(The MLP model is small and occupies very few resources, as can be seen from the resource usage at the end of the article),This project is based on Walk These Ways, This paper was published in 2022. The paper author proposes a new method of learning a single strategy that can encode a structured set of motion strategy groups to solve training tasks from different perspectives. This method is called Multiplicity of Behavior (MoB). Different motion strategies have their own advantages in generalization ability, allowing robots to choose the most suitable strategy in real-time tasks or new environments without the need for time-consuming retraining. In addition, the project provides a complete engineering implementation that is suitable as a basis for replication and optimization, so we ultimately chose this solution for deployment and testing. The overall process is divided into three steps: model training → model quantification → board deployment
1.Train
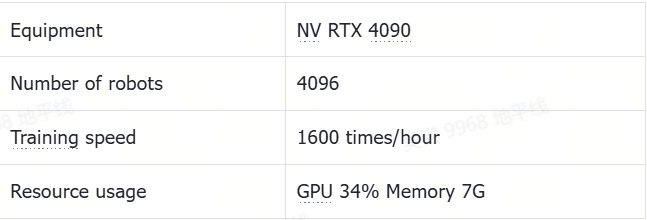
1.1 Training resource reference
1.2 Environment
Please confirm the following points before setting up the environment:
1. Confirm that the device used for traininghas a GPU and it is recommended to have at least 8GB of video memory (if you want to see the training process, please use a device with a desktop)
2. Confirm that the GPU driver has been installed and can be used normally
3. Confirm that CUDA has been installed and can be used normally
4. Suggest using conda. Avoid environmental conflicts
5. The installation of GPU drivers, CUDA, and conda can be directly referred to online tutorials, and will not be elaborated here
#Conda creates and activates the environment, this project uses Python 3.8 environment
conda create -n IsaacGym python=3.8
conda activate IsaacGym

#Clone the code and install the required software
git clone https://github.com/wunuo1/RDK-walk-these-ways-go2.git -b s100
cd RDK-walk-these-ways-go2
pip install -e .

#Download IsaacGym and unzip it in the training environment,https://developer.nvidia.com/isaac-gym
#Install and use IsaacGym,https://junxnone.github.io/isaacgymdocs/install.html
tar zxvf IsaacGym_Preview_4_Package.tar.gz
cd isaacgym/python
pip install -e .
pip show isaacgym

#Torch has a version correspondence with CUDA
conda install pytorch==2.4.1 torchvision==0.19.1 pytorch-cuda=12.1 -c pytorch -c nvidia
pip install ml-logger ml-dash --upgrade --no-cache
1.3 训练
If you do not want to visualize the training process, please set headless=True in the env=VelocityTrackingEasyEnv' (sim_device='cuda: 0 ', headless=False, cfg=Cfg) of train.py. If you want to see the training process, please set headless=False (the system has a display desktop), but turning on the display will occupy training resources and cause a decrease in training speed.
Regardless of whether visualization is enabled or not, there will be video saved during the training process, and the path is RDK-walk-these-ways-go2/runs/gait-conditioned-agility/xxxx-xx-xx/train/xxxxxx/videos
#num_envs:Number of robots(If there is not enough memory, reduce the quantity and add Cfg.env.num_denvs=xxx to the train_go2 function in train.py)
#num_learning_iterations:训练轮数(runner.learn(num_learning_iterations=10, init_at_random_ep_len=True, eval_freq=100))
python scripts/train.py

#After completing the training, set the model path and configuration file path in play.exe to view the training effect
python scripts/play.py
1.4 数据可视化
#The numerical changes of various rewards during the visualization training process
#Open a new terminal, open the ml_dash frontend, and use port 3001 by default
python -m ml_dash.app

#Open another terminal, enter the RDK-walk-these-ways-go2 folder, open the ml_dash service, which defaults to 8081
python -m ml_dash.server .

#Open the browser, enter localhost:3001, wait for the interface to open
#Username: Runs API: http://localhost:8081 Access token: No need to input
#Click on the newly generated Profile, select the training data you want to see, and click on the red box to display the numerical changes of each reward
1.5 Retrieve the model and export the onnx file
During the training process, different iterations of weights, the latest weights, the latest adaptation_module model, and the latest body model will be saved. Therefore, it is necessary to extract the most effective adaptation module model and body model (the highest total reward model was obtained in approximately 24000 rounds of experiments)
#Run tool.py in the tools folder and specify the path to convert weights_xxxx.pt (select the weights_xxxx.pt with the highest total reward) at runtime
#This script will extract two models, adaptation_module and body, from weights_xxxx.pt and export them in onnx format
python3 tool.py path_of_weights_xxxx.pt
1.6 Reward Function Description
The reward function is located in RDK-walk-these-ways-go2/go2_gym/envs/rewards/corl_rewards.py, and a new reward function (_reward_xxx) can be added in the format of the function. At the same time, the corresponding weight coefficient (xxx) needs to be set in the reward_scales class of RDK-walk-these-ways-go2/go2_gym/envs/base/legged_robot_config.py. When the weight coefficient is 0, the reward will not take effect.
2. Quantify
2.1 Environment
#Pull S100 toolchain Docker image([docker image and OE](https://developer.d-robotics.cc/rdk_doc/rdk_s/Advanced_development/toolchain_development/overview/))

#Extract the folder used for model quantization and unzip it. Please refer to the attachment at the end of the article (this folder contains the configuration files and calibration data required for quantization)

#Place the exported onnx model in the quantization folder (ensuring that the model name matches the configuration file), and hang the folder in the Docker environment to create a container
sudo docker run -it --entrypoint="/bin/bash" -v folder_path:/go2_model_convert_s100 image_ID
2.2 Compile(Int16)
#cd folder
cd /go2_model_convert_s100

#Quantify adaptation_madule, generate the model_output folder, and store the .bin model
hb_compile -c ad_config_bpu.yaml --march nash-e

#Quantify the body, generate the model_output folder, and store the .bin model
hb_compile -c body_config_bpu.yaml --march nash-e
3.Deployment
3.1 Material
3.1.1 Bill of Materials
The STL file of the bracket can be found in the bracket folder of RDK-walk-thes-ways-go2
3.1.2 Device connection
3.2 Environment
3.2.1 Clone code
git clone https://github.com/wunuo1/RDK-walk-these-ways-go2 -b s100
cd RDK-walk-these-ways-go2
pip install -e .
pip install torch==1.10.2 torchvision==0.11.3
3.2.2 Compile lcm
git clone https://github.com/lcm-proj/lcm.git
cd lcm
mkdir build
cd build
cmake ..
make
sudo make install
3.2.3 Compile Unitree SDK
cd RDK-walk-these-ways-go2/go2_gym_deploy/unitree_sdk2_bin/library/unitree_sdk2
rm -r build
sudo ./install.sh
mkdir build
cd build
cmake ..
make
3.2.4 Compile lcm_position_go2
cd go2_gym_deploy
rm -r build
mkdir build
cd build
cmake ..
make -j4
3.2.5 Connect the Go2 through Ethernet cable
#Set static IP
vim /etc/netplan/01-hobot-net.yaml
eth0:
  dhcp4: no
  dhcp6: no
  addresses:
      - 192.168.123.100/24
  gateway4: 192.168.123.1

#ping Go2,Go2‘s IP 192.168.123.161
ping 192.168.123.161

#Check the network card settings and confirm the network card number. This is eth0, used to start the lcm_position_go2 function later
ifconfig
3.2.6 Compile model infer library
git clone https://github.com/wunuo1/model_task.git -b s100
cd model_task
mkdir build
cd build
cmake ..
make -j4
cp libmodel_task.so RDK-walk-these-ways-go2/go2_gym_deploy/scripts
3.3 Run
3.3.1 Run command
#Run lcm_position_go2,Used for communicating with the underlying control board and outputting operations based on logs after startup,Press' Enter ', please note that after successfully entering, the program must start normally before running the strategy script
cd go2_gym_deploy/build
sudo ./lcm_position_go2 eth0

#Open another terminal, load the running strategy, and output the operation according to the log after startup. Press "R2" for the first time to change to a stationary standing state, and press "R2" for the second time to start control
#Provide onnx running scripts, interested can use them
python3 deploy_policy_s100.py
3.3.2 Resource usage
3.3.2.1 Use bin model
Model inference+processing logic function occupancy: Single core CPU 28.5%, memory 3.5%, BPU 1%
3.3.3 Effect
4. Acknowledgments
Thank you for the strong support from Horizon Robotics Laboratory! Thank you to Wang Yucheng and Wang Kaihui for their strong assistance!