Introduction
1. Project Background
Since Pangu separated heaven and earth, humans have continuously explored the mysteries of all things in the universe. The ancients explained nature through mythology and envisioned intelligent life in their ideals with imagination. From Nvwa creating humans to Lu Ban crafting wooden figures, Chinese civilization has since ancient times contained the concept and pursuit of “humanoid devices.” After entering the industrial civilization, with the rapid development of mechanical manufacturing and electronic technology, the desire to endow machines with a “human form” is no longer just a dream in mythological legends.
In the early 20th century, the concept of robots in Western literary works gradually took shape, and countries such as Japan and the US were the first to bring robot prototypes into reality. Especially since the 21st century, breakthroughs in key fields such as artificial intelligence, perception technology, and servo control have injected soul into bipedal robots and humanoid robots. They are no longer just clumsy robotic arms, but have gradually acquired “human-like” capabilities such as perceiving the environment, walking autonomously, and voice interaction.
In the past decade, bipedal and humanoid robots have witnessed explosive growth in technology and applications. From Boston Dynamics’ Atlas to Tesla’s Optimus, and then to the catch-up efforts of a series of domestic startup teams, humanoid robots are moving from the laboratory to the eve of industrialization. They are not only symbols of the integration of artificial intelligence and robotics technology but also regarded as “new species” in future service, manufacturing, healthcare, and other fields, carrying humanity’s millennium-long dream of intelligent mechanical companions.
Gaoqing Electromechanical is a High Tech enterprise specializing in the research and development of core technologies for intelligent robots, committed to creating robot products with independent core components and highly integrated solutions. The company’s team has profound capabilities in mechatronics and embedded system development, and its products are widely used in fields such as education and scientific research, industrial automation, and service robots. Gaoqing Electromechanical adheres to the concept of “technology as the foundation, innovation-driven” to promote the high-quality development of the domestic robot industry chain.
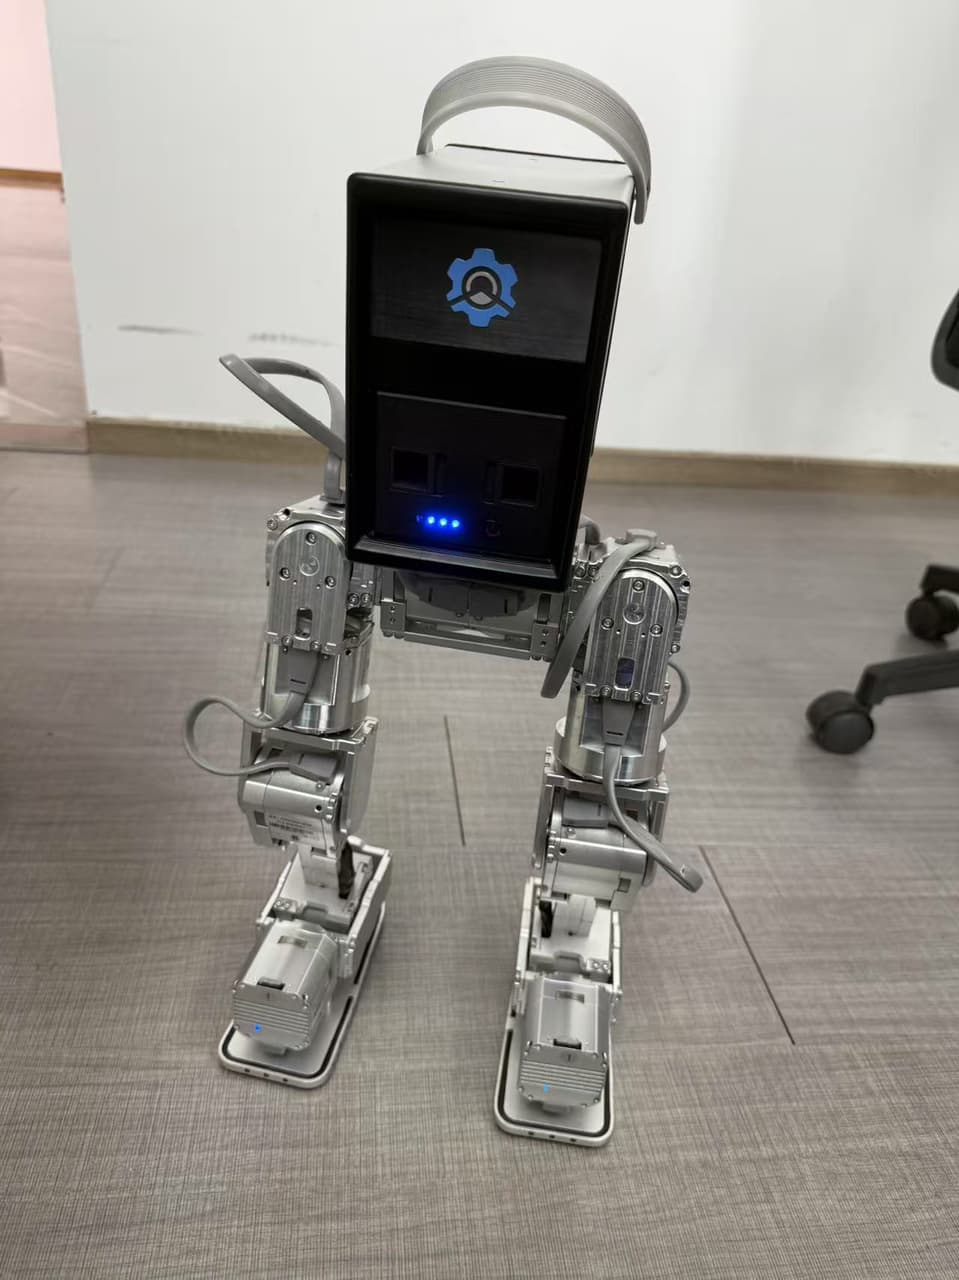
“Little Pi” is a lightweight bipedal robot platform launched by Gaoqing Electromechanical, integrating motion control, sensing perception, and intelligent interaction. This robot has the ability to walk with a humanoid gait, adopts a modular design, and is convenient for colleges, universities, and research institutions to conduct secondary development and algorithm verification. Through an open software interface and powerful hardware platform support, “Little Pi” has become an ideal carrier for interdisciplinary research in artificial intelligence, control theory, and robotics.
The RDK S100, launched by Digua Robotics, is a high-performance embedded computing power platform with up to 80 TOPS (trillion operations per second) of artificial intelligence inference capabilities, suitable for high-load scenarios such as Edge Computing, robot vision, and SLAM navigation. This platform features a compact size, optimized power consumption, multiple high-speed interfaces, and compatibility with various mainstream sensors and controllers, making it an indispensable core module for building intelligent robot systems.
2. Project Introduction
This project aims to achieve the in-depth integration of the RDK S100 high computing power platform with the Gaoqing Electromechanical bipedal robot “Little Pi”, creating a high-performance intelligent control system for bipedal robots that is oriented towards the future. By using the RDK S100 as the core computing power support platform for “Little Pi”, it not only provides powerful AI inference capabilities and real-time computing capabilities but also enables it to possess “brain-like” intelligence such as autonomous environmental perception, behavior planning, and dynamic control.
The RDK S100 is a high computing power platform based on Diguo Robot self-developed Nash architecture BPU (Brain Processing Unit), with up to 80 TOPS of AI inference capabilities, specifically designed for robot perception computing and edge intelligence. This platform not only integrates multiple high-speed interfaces, enabling efficient docking with various types of sensors and execution units, but also supports low latency and multi-task concurrent processing, making it highly suitable for deployment in mobile robot systems operating in complex dynamic environments.
As a lightweight bipedal robot launched by Gaoqing Electromechanical, “Little Pi” adopts modular design, has good stability and expandability, and is an ideal carrier for educational research and intelligent control algorithm testing. Previously, due to the computational power bottleneck of traditional embedded controllers, it had certain limitations in tasks such as multi-modal perception and dynamic motion control in complex environments.
By leveraging the integration of RDK S100, the project will build the intelligent motion control brain of “Little Pi”: at the lower level, it will complete high-frequency real-time motion control and stability maintenance, and at the higher level, it will implement path planning, behavior decision-making, and interactive feedback based on visual and sensor data. The platform will support the operation of advanced algorithms including SLAM, pose estimation, reinforcement learning control strategies, etc., enabling “Little Pi” to have smoother humanoid gaits, more complex task execution capabilities, and more natural human-machine interaction performance.
This project is not only an attempt at engineering technology integration but also a profound practice of the concept of “computing power empowering humanoid robots”. It will promote the practical implementation of high-performance AI platforms in the field of robotics, expand the application boundaries of “Little Pi” in scientific research, teaching, demonstration, and even service scenarios, and lay a solid foundation for domestic bipedal robots to reach a higher level of intelligence.
Project Preparation Process
1. Material Preparation
For this project, we need to prepare the following materials:
-
One laptop
-
USB docking station (optional)
-
network cable
-
One RDK S100
-
One RDK S100 power cord
-
One SD card
-
One small Pi device held high
-
Hold up the fully charged battery of Little Pi
2. Local model conversion
2.1 Model Quantization
We first prepare the S100 toolchain environment on the local machine.
We pull the GitHub repository on this machine:
git clone https://gitee.com/chenguanzhong/rdk_s100_hightorque_pi.git
Models that need toolchain conversion are located in the following directory:
cd rdk_s100_hightorque_pi/resource/model
The model file is policy.onnx , and we need to copy this file separately into a folder
First, pull the S100 toolchain docker mirroring (please contact the engineer to obtain the docker mirroring and OE package), then pull the folder for model quantization and decompress it (please contact the engineer to obtain the folder for model quantization, which contains the configuration files and calibration data required for quantization).
Place the ONNX model under the folder for quantization (ensure that the model name is consistent with that in the configuration file), mount this folder to the Docker environment, and create a container (this step requires you to modify the host folder path and mirroring ID yourself, and this path will contain the above-mentioned `policy.onnx` model file):
sudo docker run -it --entrypoint="/bin/bash" -v main_folder_dir:/ht_model_convert_s100 image_id
2.2 Model Conversion
cd /ht_model_convert_s100

hb_compile -c policy_ocnfig.yaml --march nash-e
After the model conversion is completed, we will see a series of echoes, which will be saved in hb_compile.log. An example of this log is as follows:
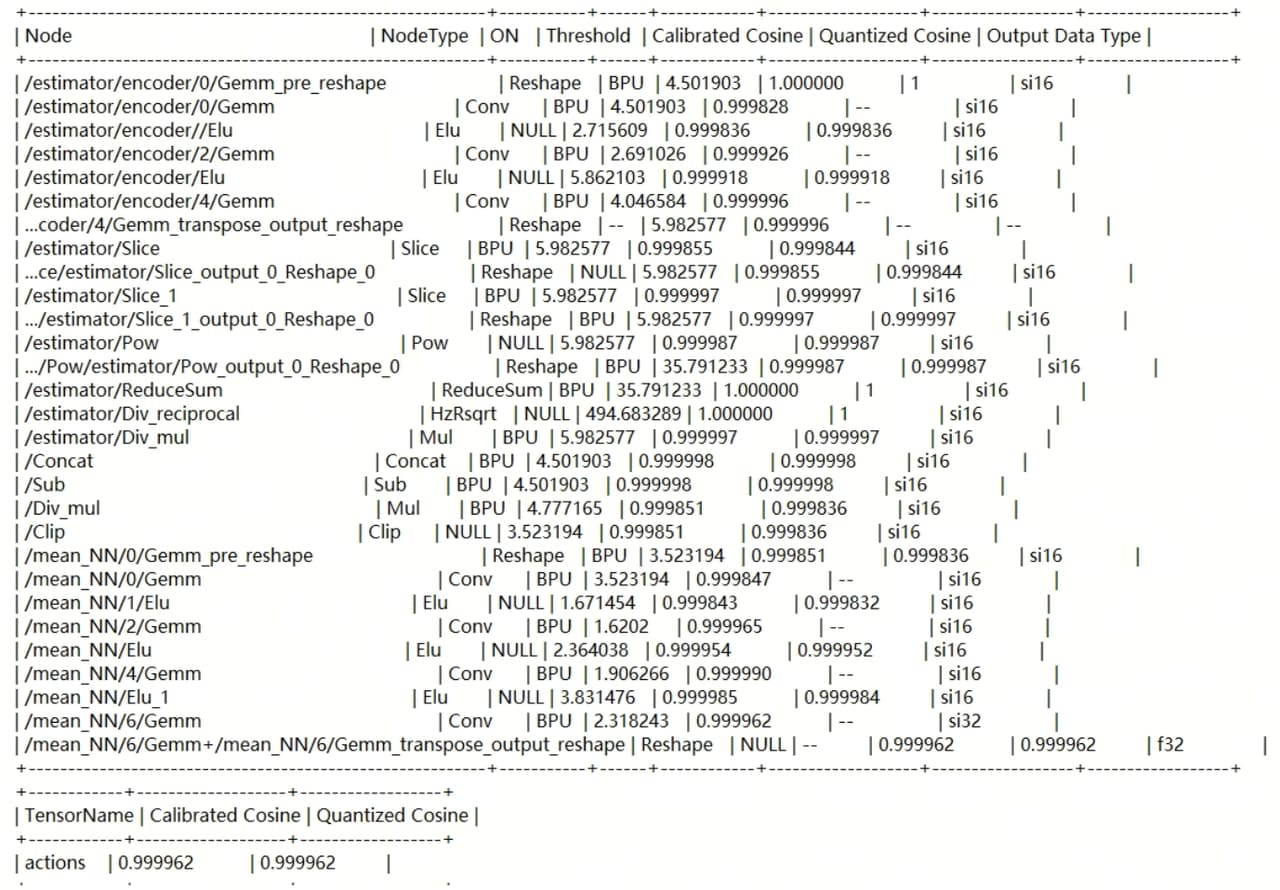
We can see the cosine similarity of each layer, as well as the overall cosine similarity, in this log.
The cosine similarity of the final result is divided into Calibrated Cosine and Quantized Cosine. As we can see from the table, they are 0.999962 and 0.999962 respectively, both greater than 0.9999 (four 9s).
Along with the hb_compile.log file, we can see that the compilation output also includes a model_output_body folder. When we enter this folder, we can see that it contains a series of onnx and other model files.
**The file useful to us is `policy.hbm`, which is a sweet potato heterogeneous model file that can be deployed on the RDK S100 BPU, and we will need this file for subsequent deployment.**
3. Preparation for Gaoqing Xiaopi Environment
After we obtain the bipedal robot Xiao Pi from Gaoqing Electromechanical, please ensure that Xiao Pi has sufficient battery power. For the specific charging method, please refer to the second part of the Engineering Deployment Process
After completing the charging of Xiao Pi, we use a network cable to log in to the Lu Ban Cat that comes with Xiao Pi, ** Here we assume that the Lu Ban Cat that comes with Xiao Pi has a static IP, and the static IP is `192.168.129.10` ** .
The username that comes with Xiao Pi is hightorque , and the login password is ht . We can use MobaXterm to log in.
After completing the login, we pull the GitHub repository:
git clone https://gitee.com/chenguanzhong/rdk_s100_hightorque_pi.git
After completing the pull, we copy the sim2real_master_dg folder inside and paste it into the root directory:
cd rdk_s100_hightorque_pi
cp -r sim2real_master_dg ~
cd ~
After we have completed the copying of the corresponding folder and switched back to the root directory, we build the project:
source /opt/ros/noetic/setup.bash
catkin build -j1
The entire build takes ~30 minutes, please wait patiently.
4. RDK S100 Environment Preparation
After obtaining the RDK S100, in order to ensure that the RDK S100 has an operating system, we need to prepare an SD card for burning.
For specific details on burning the card, please refer to the official website of the D-Gua Robot Community, under the section of Materials, System Flashing: https://developer.d-robotics.cc/rdk\_doc/install\_os
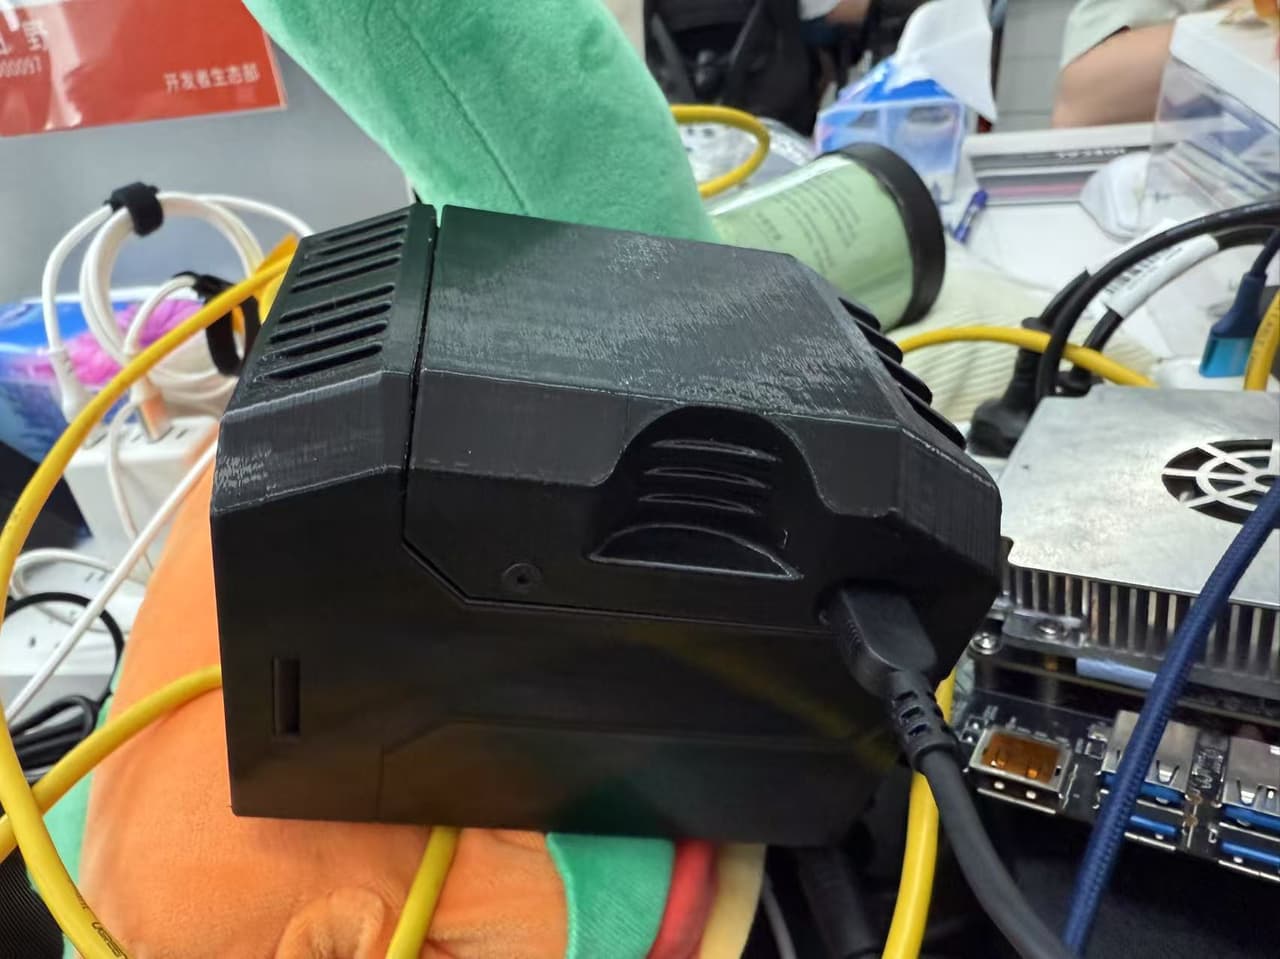
After completing the system burning of the SD card, we insert the burned SD card into the RDK S100. We power on the RDK S100 by inserting the power cord of the RDK S100 into the round hole, ensuring that the red light of the RDK S100 lights up.
We connect the RDK S100 to the local laptop via Ethernet cable, this tutorial assumes that the static IP of the RDK S100 is 192.168.1.100, the username is root, and the login password is root , and uses MobaXTerm to log in.
We will pull the github repository to the root directory and create a gaoqin directory:
cd ~
mkdir gaoqin
git clone https://gitee.com/chenguanzhong/rdk_s100_hightorque_pi.git
We copied the file out to the gaoqin directory,
cd rdk_s100_hightorque_pi
cp model_task-s100.zip ~/gaoqin
cp main.py ~/gaoqin
And in the gaoqin directory, we store the policy.hbm file mentioned above.
Deployment Notes
During the anti-external force test, only gently push left and right; do not push forward or backward, as it will fall!!!
Engineering Deployment Process
1. Power Confirmation
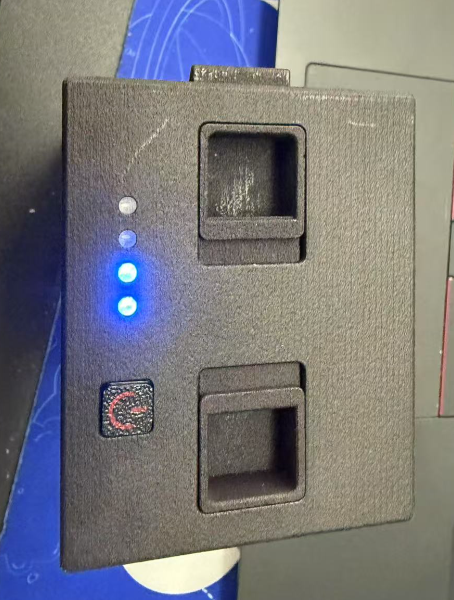
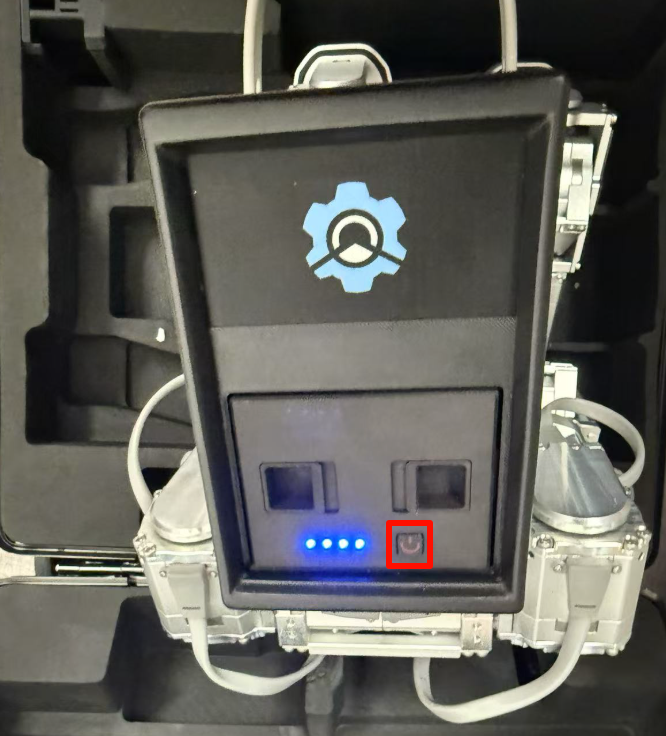
Observe the battery as follows
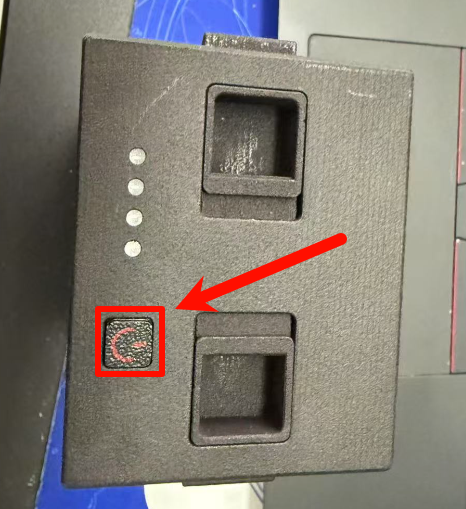
Battery on and off operations: Quick short press + long press (long press until the blue light flashes)
Turn on the battery and observe the power level. One light represents 25%, and when the battery is fully charged, all four lights will be on:
2. Charge
2.1 Battery Charging
Insert the battery into the charging slot,with the raised part of the battery facing up, pinch it with two fingers, and insert it into the charging slot
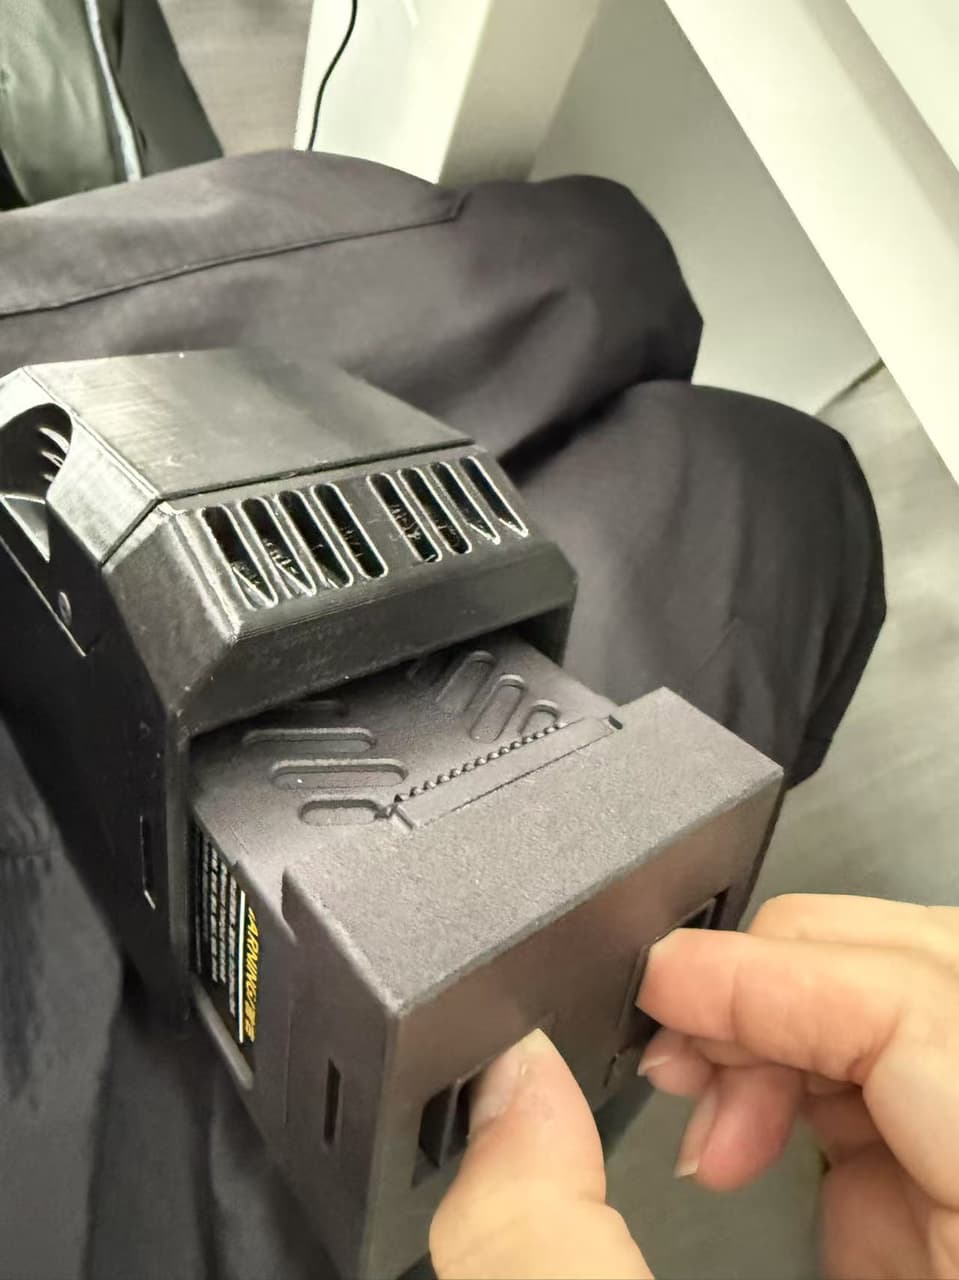
After inserting into the charging slot, you must turn on the battery to start charging (i.e., short press then long press). When you see the blue light flashing, use the original Xiaomi 120W charger (such as the charger for the company’s computer T14P), plug in the charging head, and hearing the fan noise indicates successful charging. Using a 100W charger to charge from 0 to 100% takes approximately ~1 hour.
2.2 Controller Charging
There is a Type-C charging port above the handle. Insert the Type-C charging cable, and if you see the light flashing, it indicates that charging is successful.
3. Initiate work
After ensuring that the battery and power are fully charged, we will start and connect the Xiao Pi Robot and S100 to the network.
3.1 S100 Remote Access
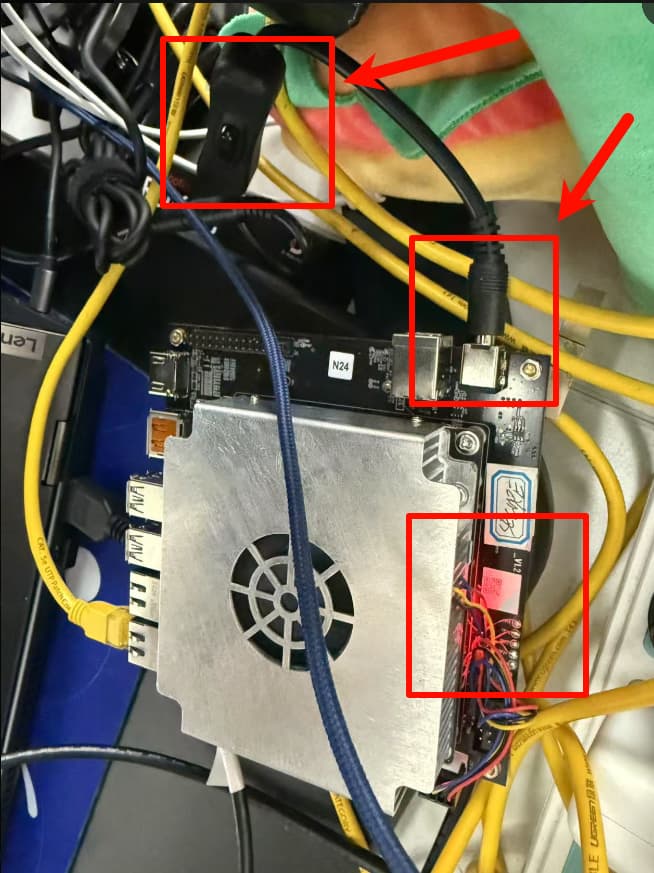
First, power on the S100. After inserting the charging cable into the charging port, turn on the switch (if it is not already on). When the red light comes on, it indicates that the S100 has been successfully powered on.
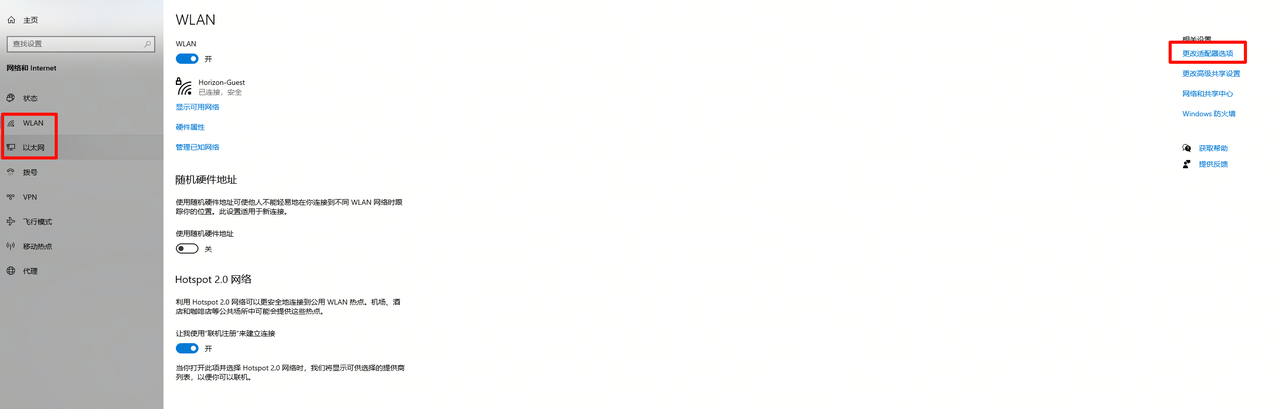
Next, use an Ethernet cable to log in to S100. Connect the two ends of the Ethernet cable to the network port of S100 and the laptop respectively. First, configure a static IP on the computer side. Open the computer settings and select “Network & Internet”:
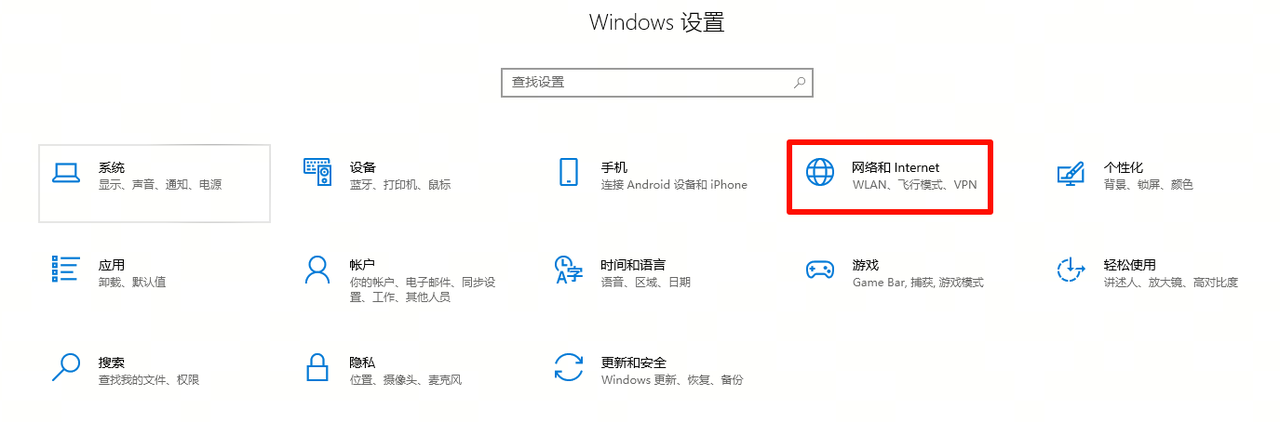
Click WLAN or Ethernet on the left, then click “Change adapter options” on the right:
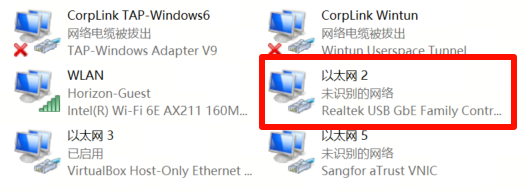
Pop up a new window to confirm which Ethernet is connected to. On my end, it is “Ethernet 2”:
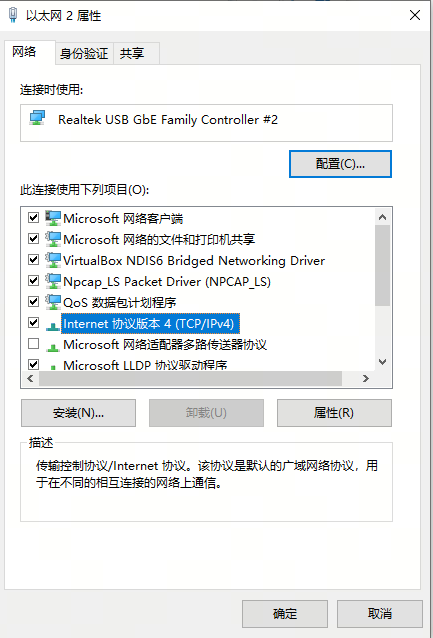
Right-click “Ethernet 2”, click “Properties”, and double-click “Internet Protocol Version 4”
Make the following modifications:
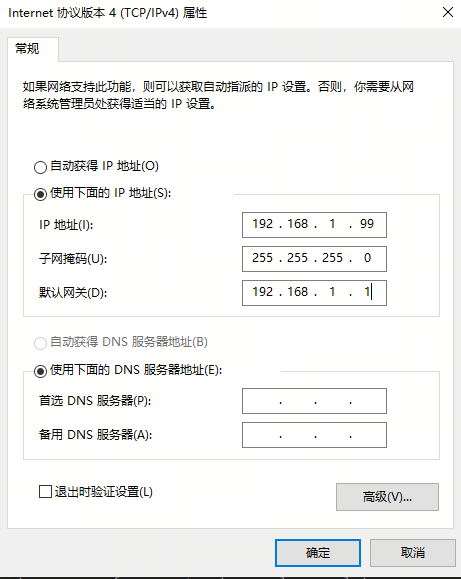
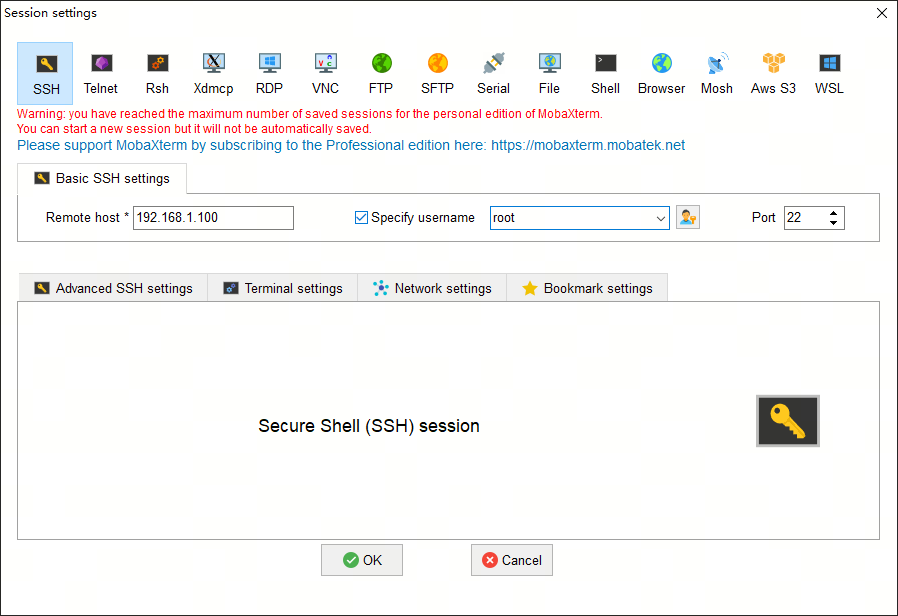
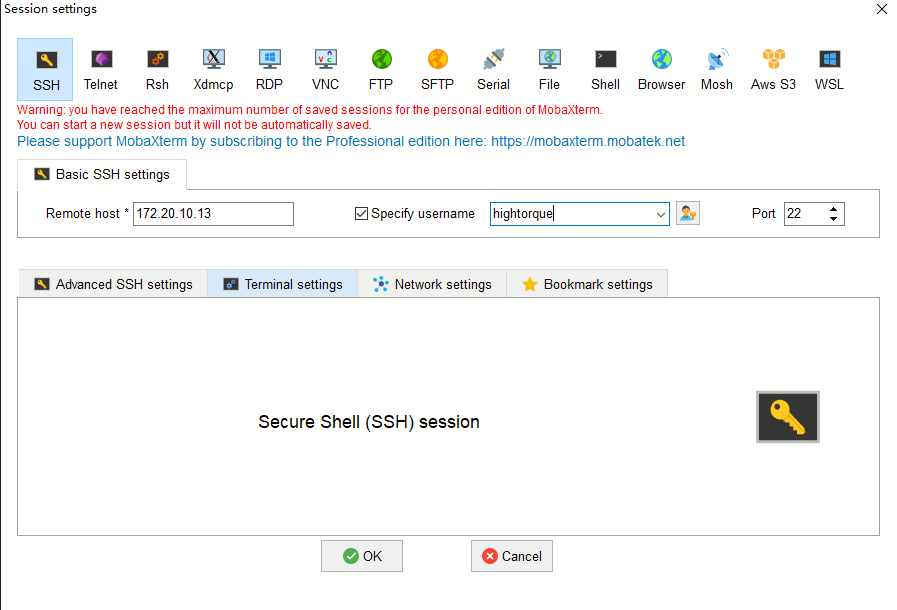
After the modification is completed, click “Confirm”, exit, open MobaXTerm, click Session, and after a new window pops up, click SSH
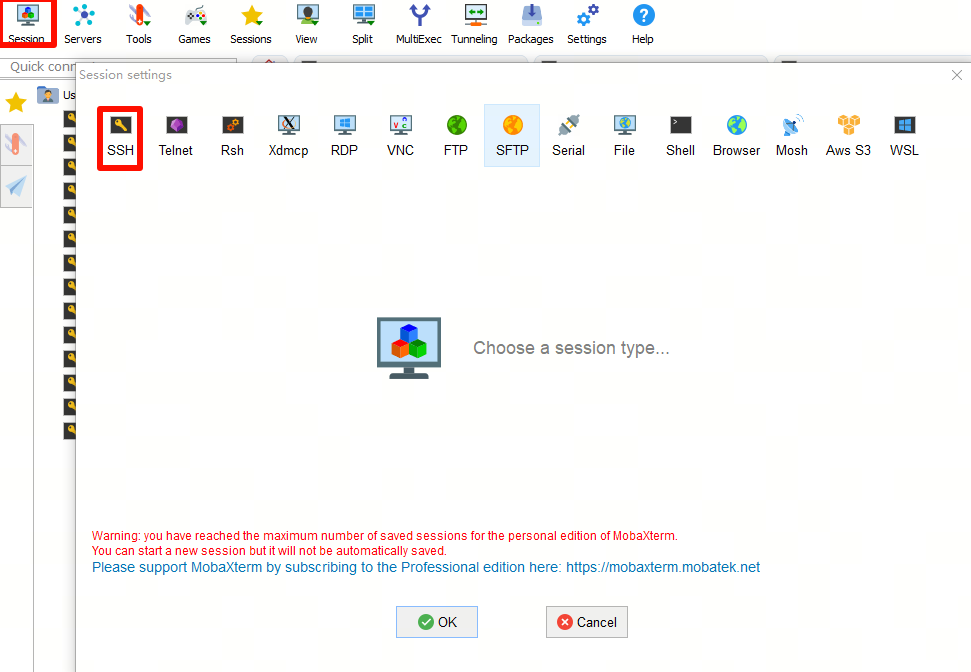
Enter 192.168.1.100 in Remote Host, root in Specify username, click OK after entering, and enter root as the password after entering
3.2 S100 Networking
Turn on the mobile hotspot, use the following command to connect to the network, and first scan for Wi-Fi:
nmcli device wifi rescan
Then display the Wi-Fi list:
nmcli device wifi list
Ensure that the name of the Wi-Fi network to be connected exists in the list.
After viewing the completed list, press Ctrl+C, then press Enter to continue the operation.
Enter your account and password to connect:
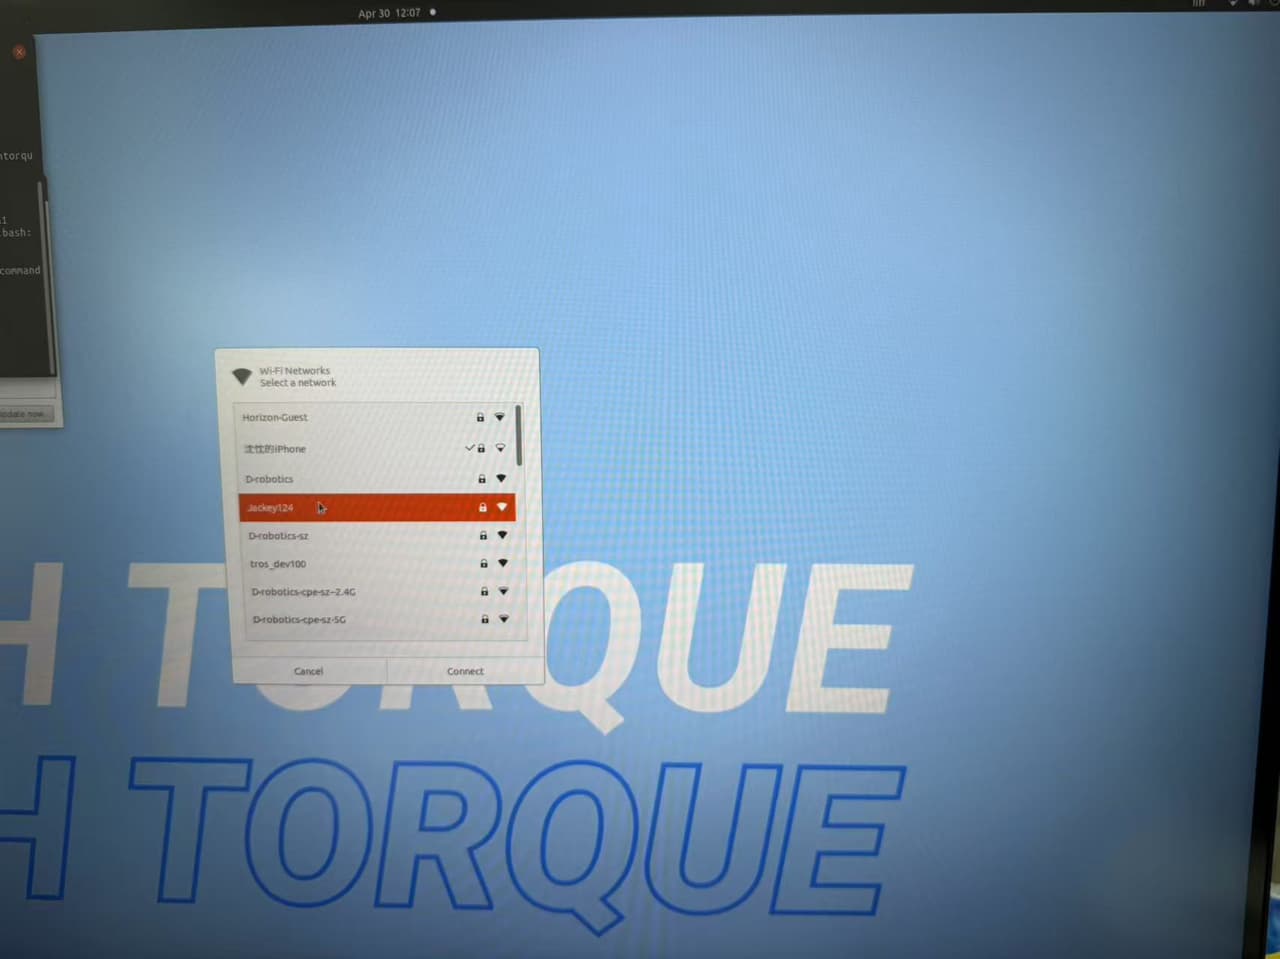
wifi_connect "Jackey124" "12345678"
Wait a moment, and if you see the following echo, it indicates that the wifi connection is successful
![]()
Connect the local computer to the same Wi-Fi:

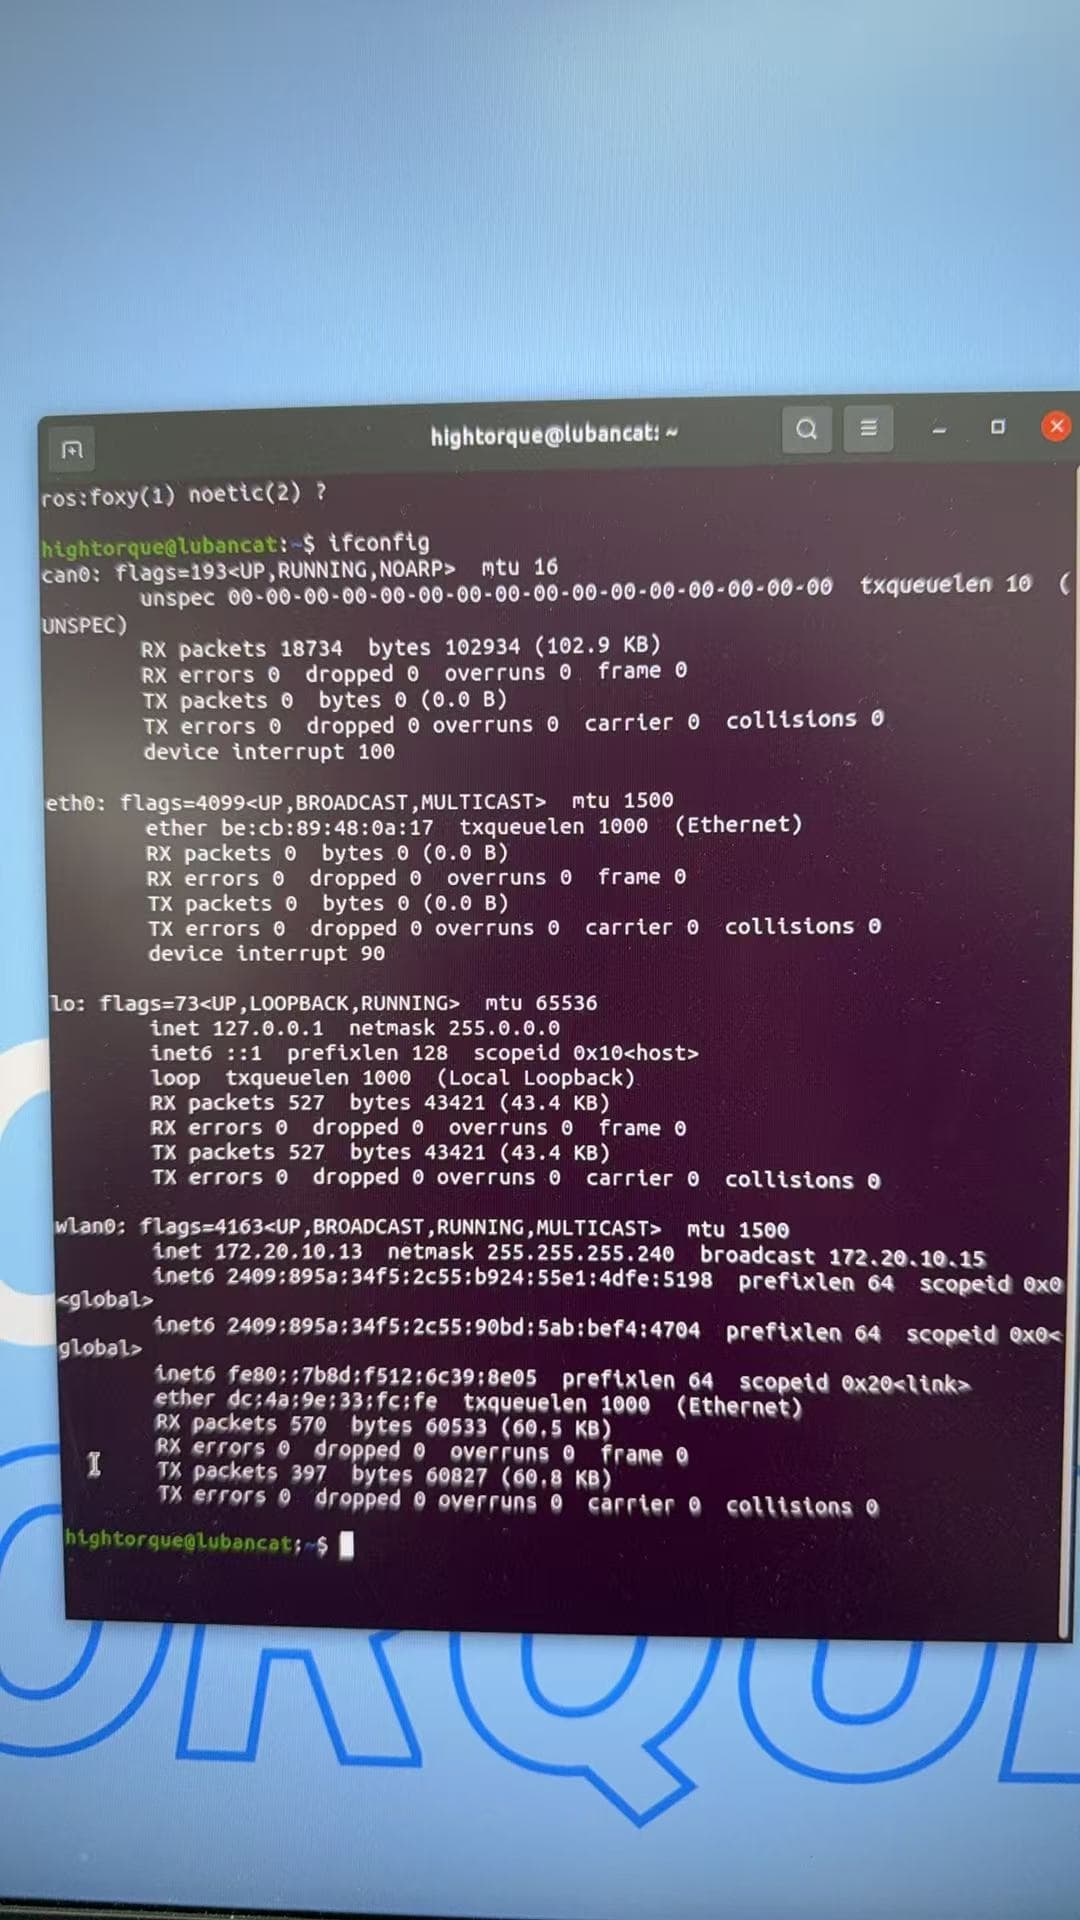
Return to mobaXTerm and check the existing network
ifconfig
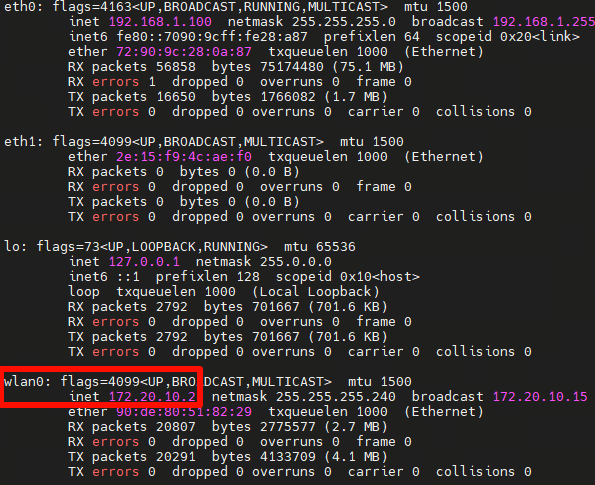
When the IP address of wlan0 is found to be 172.20.10.2, and the local machine and S100 are in the same network, the network cable can be unplugged for connection.
We open MobaXTerm again to establish a connection:
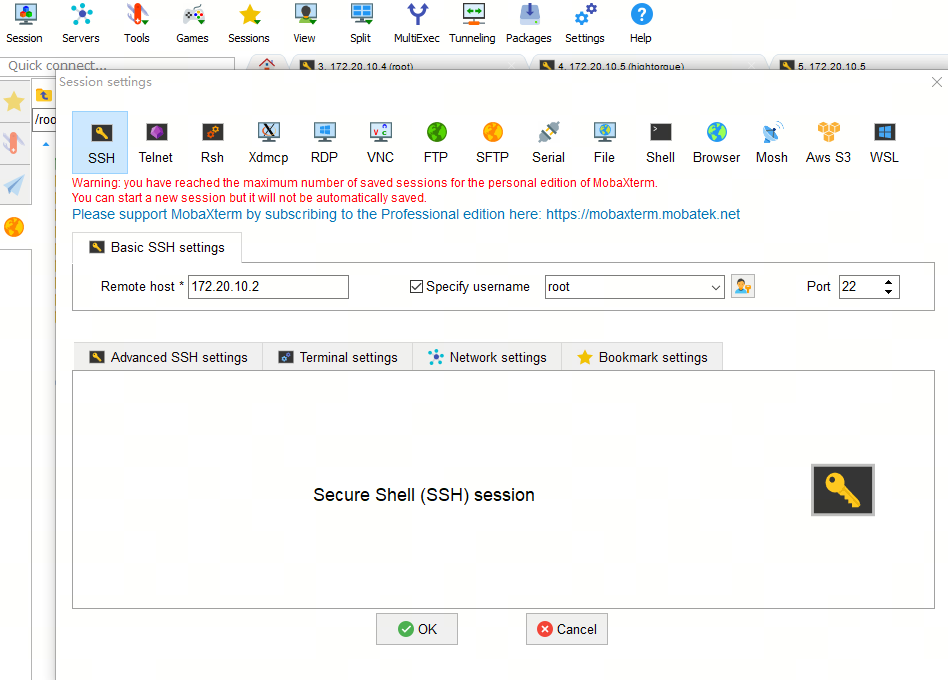
The method remains the same as before, only the IP needs to be modified to 172.20.10.2
3.3 Startup and Networking of Little Pi
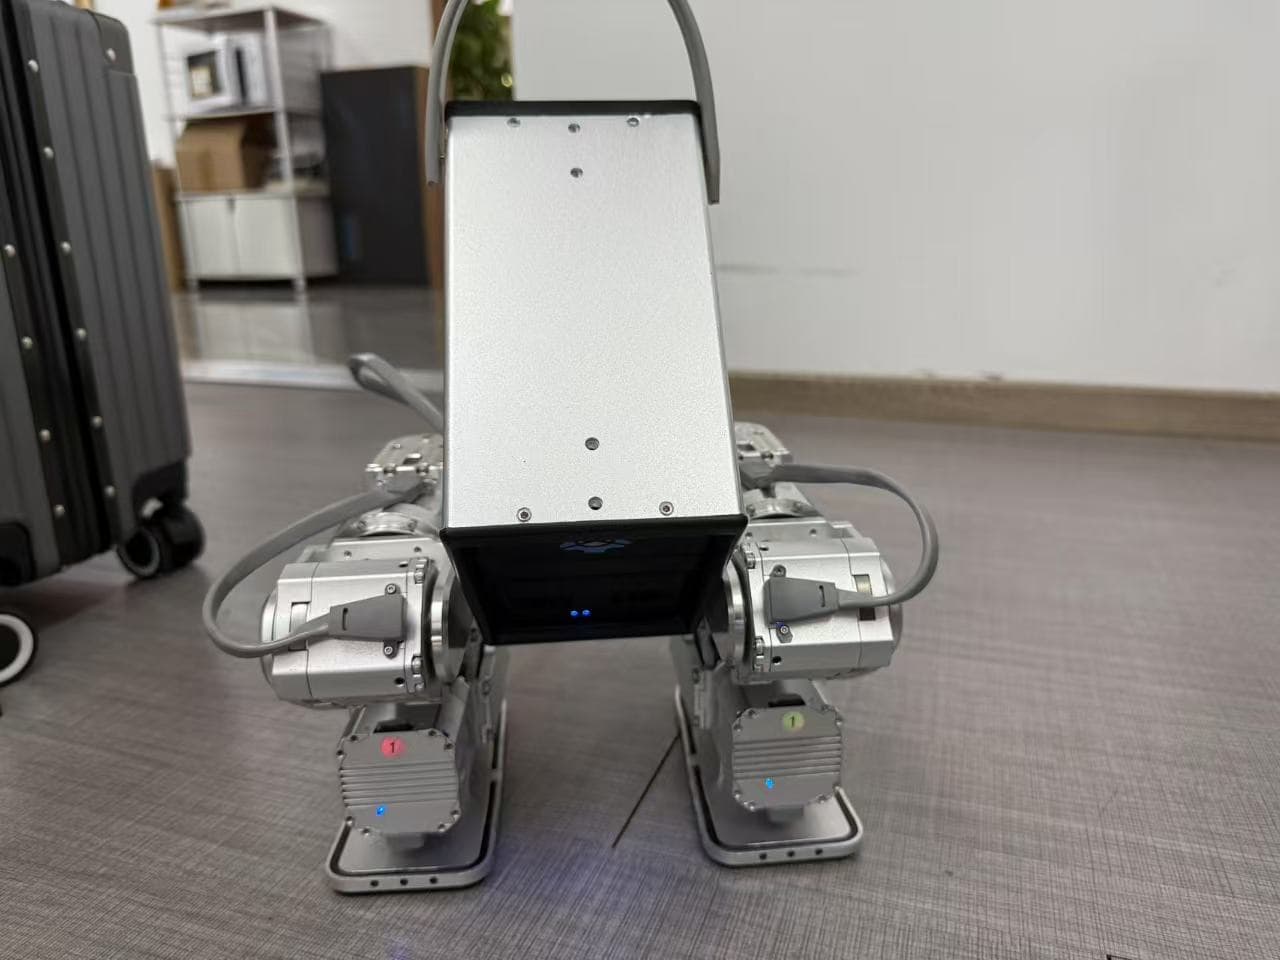
Press the latches on both sides of the battery,insert the battery into the small Pi, and turn on the battery (short press then long press):
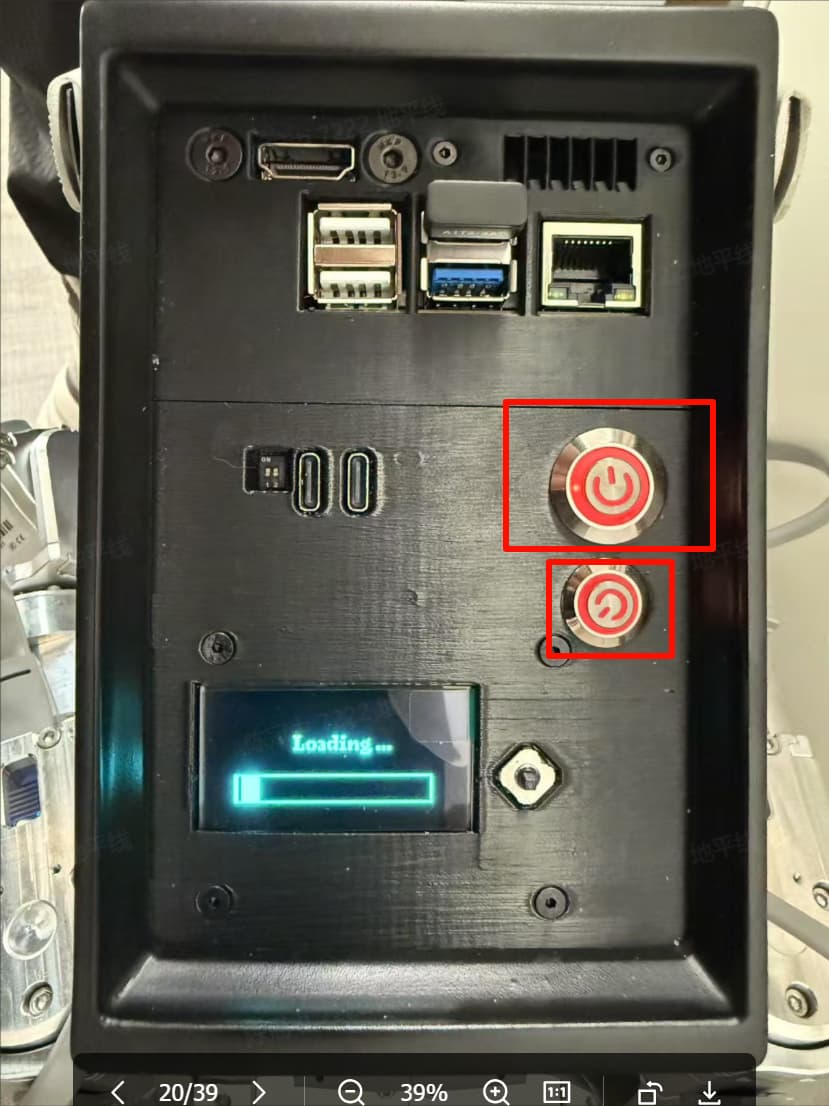
Then look at the back, firstshort press the joint module switch (the larger one), then short press and long press the main control system switch (the smaller one)
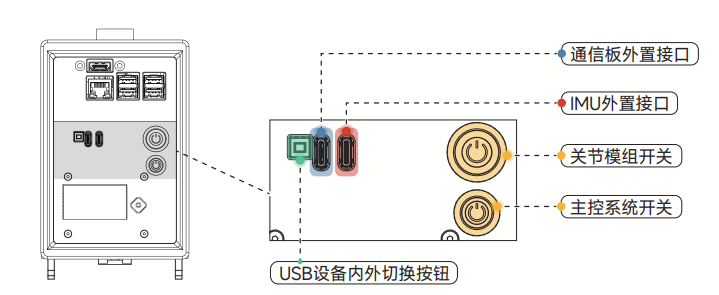
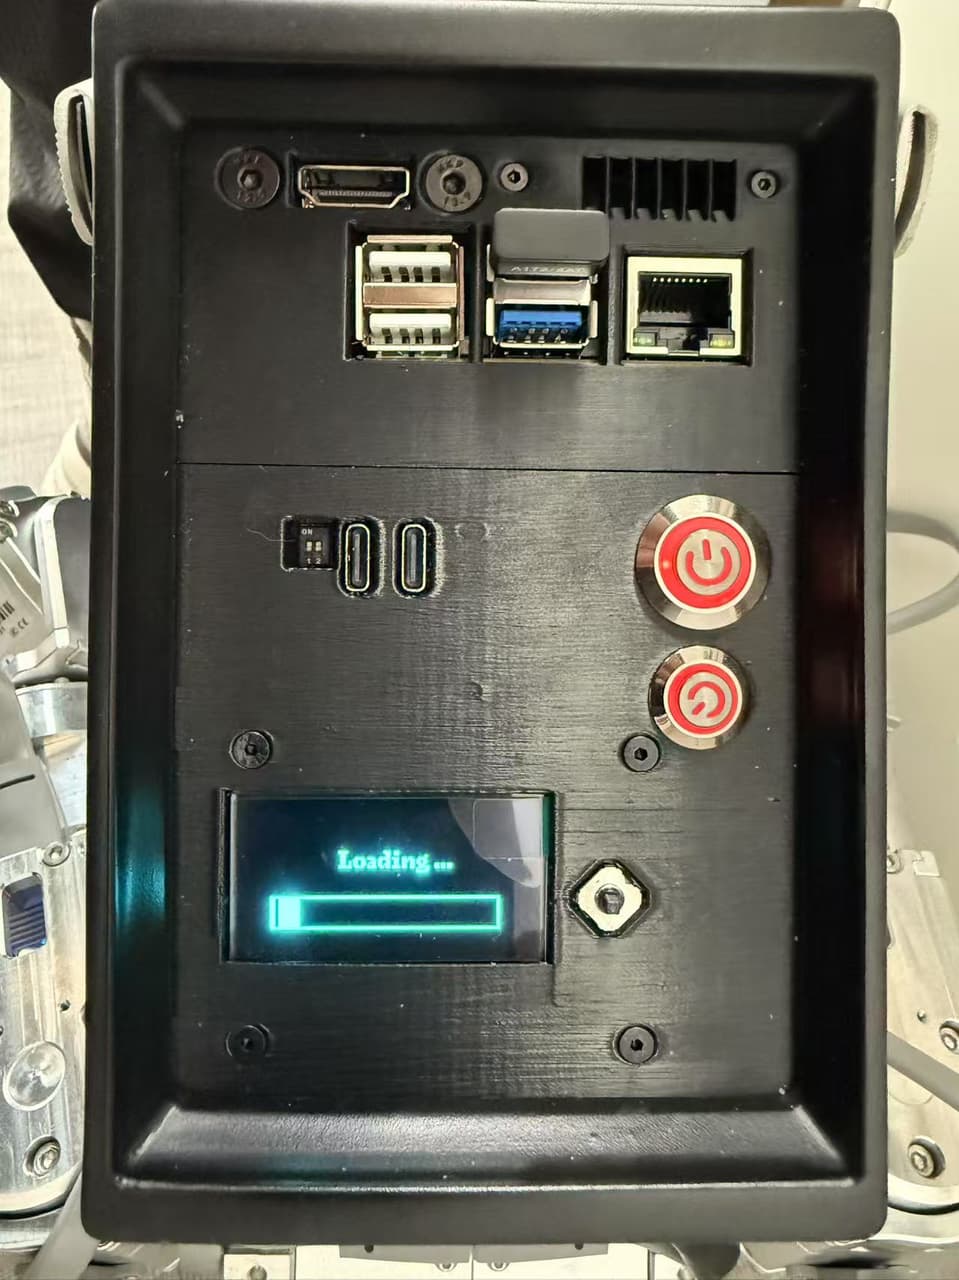
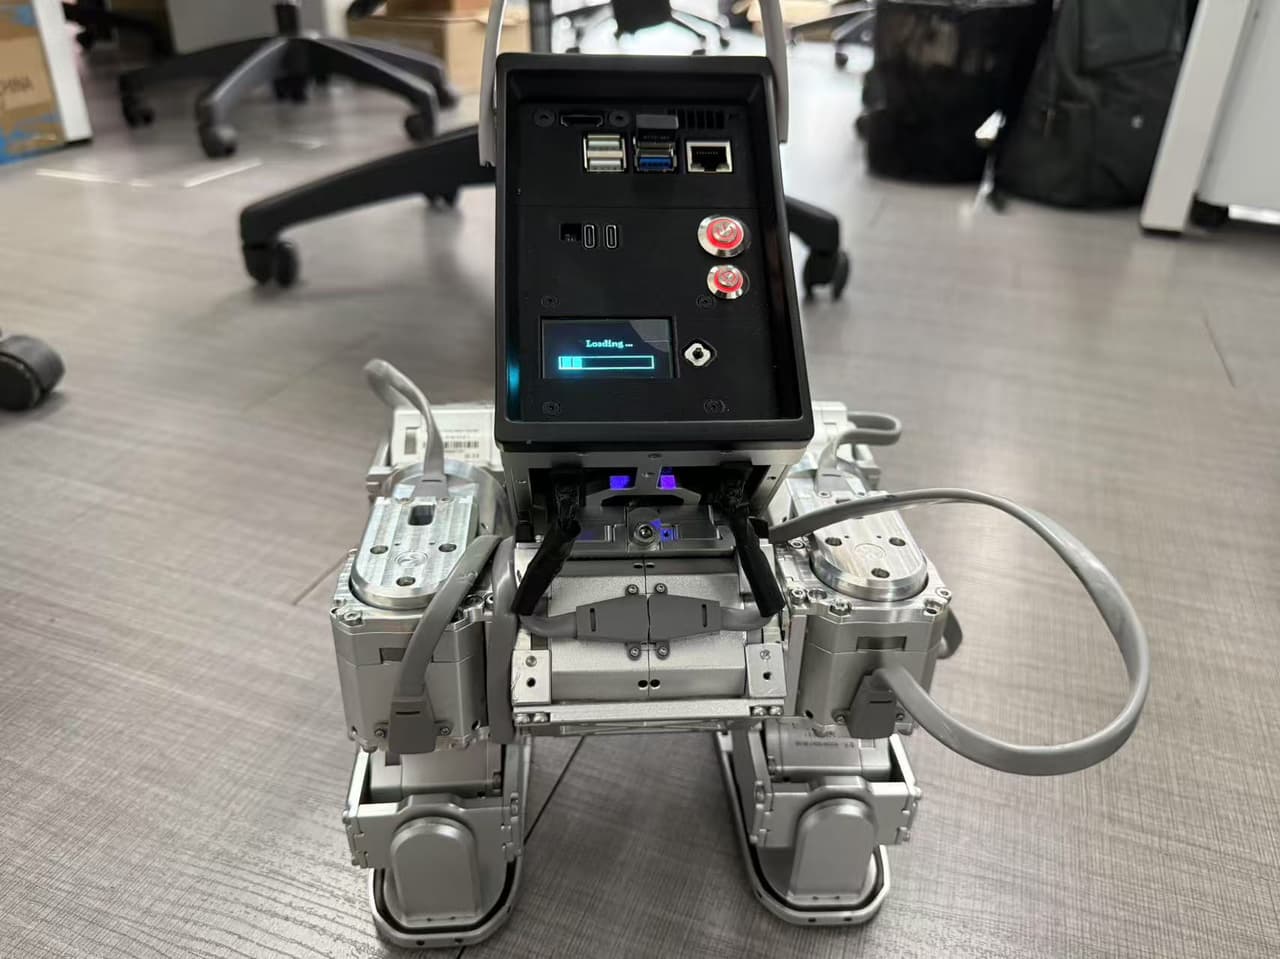
If both lights show red and the display shows “Loading..”, it indicates that you can log in to Xiao Pi
Insert the mouse, keyboard, and HDMI display cable respectively into:
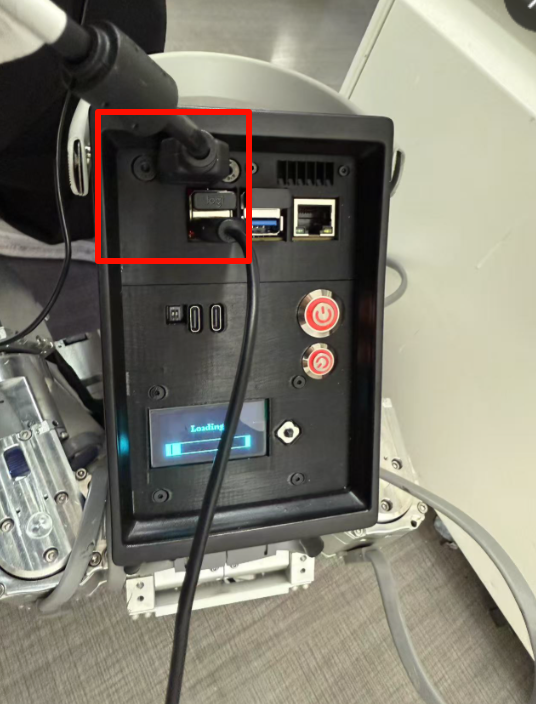
Ensure the screen is powered on, then you can see the Gaoqing Electromechanical screen display. Connect to Wi-Fi through the graphical interface, click `Connect`, and enter the password.
Open a new window (Ctrl + Alt + T), then enter
ifconfig
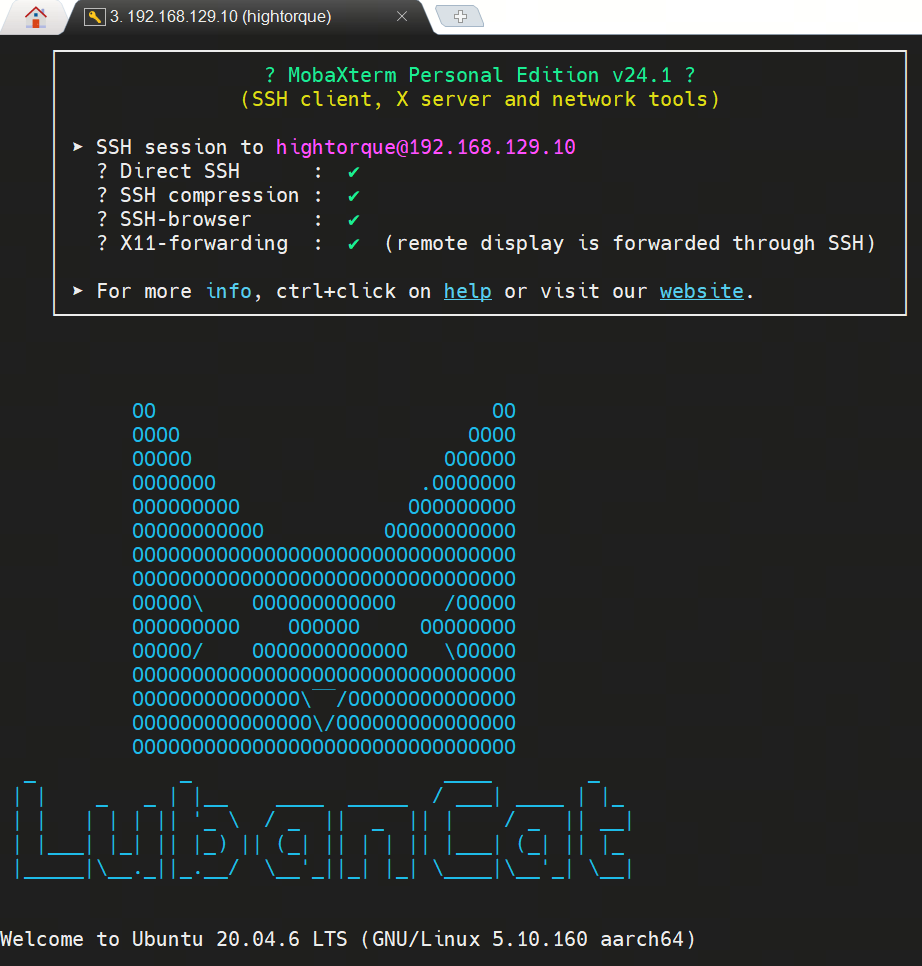
By checking the IP of wlan0, you can see that it is 172.20.10.13. At this time, all three devices are on the same network segment, indicating that we can use MobaXTerm for wireless access. Using the old method, the difference is that the IP is now 172.20.10.13, and the username is hightorque. After clicking OK, you will be prompted to enter the password, which is ht . After completing the password input, you can log in remotely:
After logging in remotely, you will see the Lu Ban Cat interface:
At this time, we can ping 172.20.10.2 from 172.20.10.13. Similarly, we can also ping 172.20.10.13 from 172.20.10.2
Example:
Enter in Lu Ban Cat’s 172.20.10.13
ping 172.20.10.2
4. Program startup
4.1 Lu Ban Cat Program Startup
In Lu Ban Cat (172.20.10.13), switch directories:
cd ~/sim2real_master_dg
Activate Workspace:
source devel/setup.bash
Start Xiao Pi:
roslaunch sim2real sim2real.launch
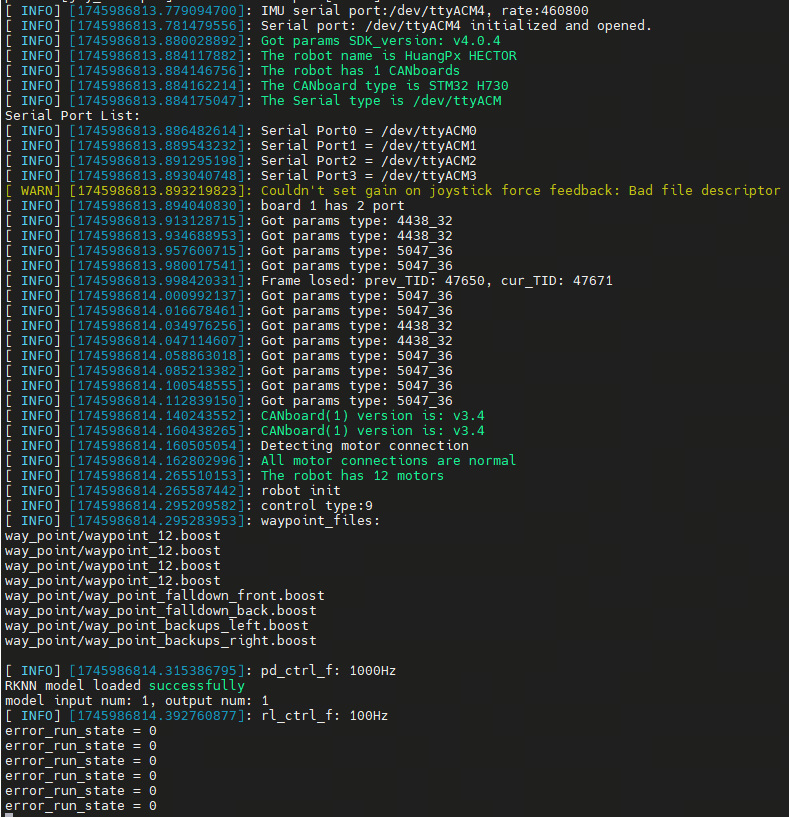
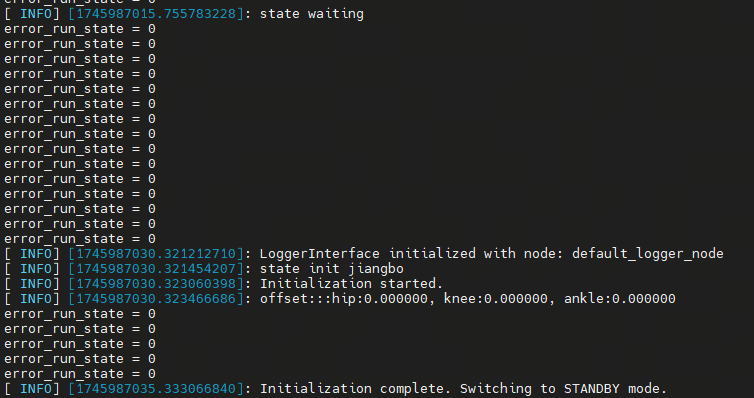
If there are no red error messages in the echo and error_run_state=0 is continuously printed, it indicates successful startup
4.2 Little Pi Standing
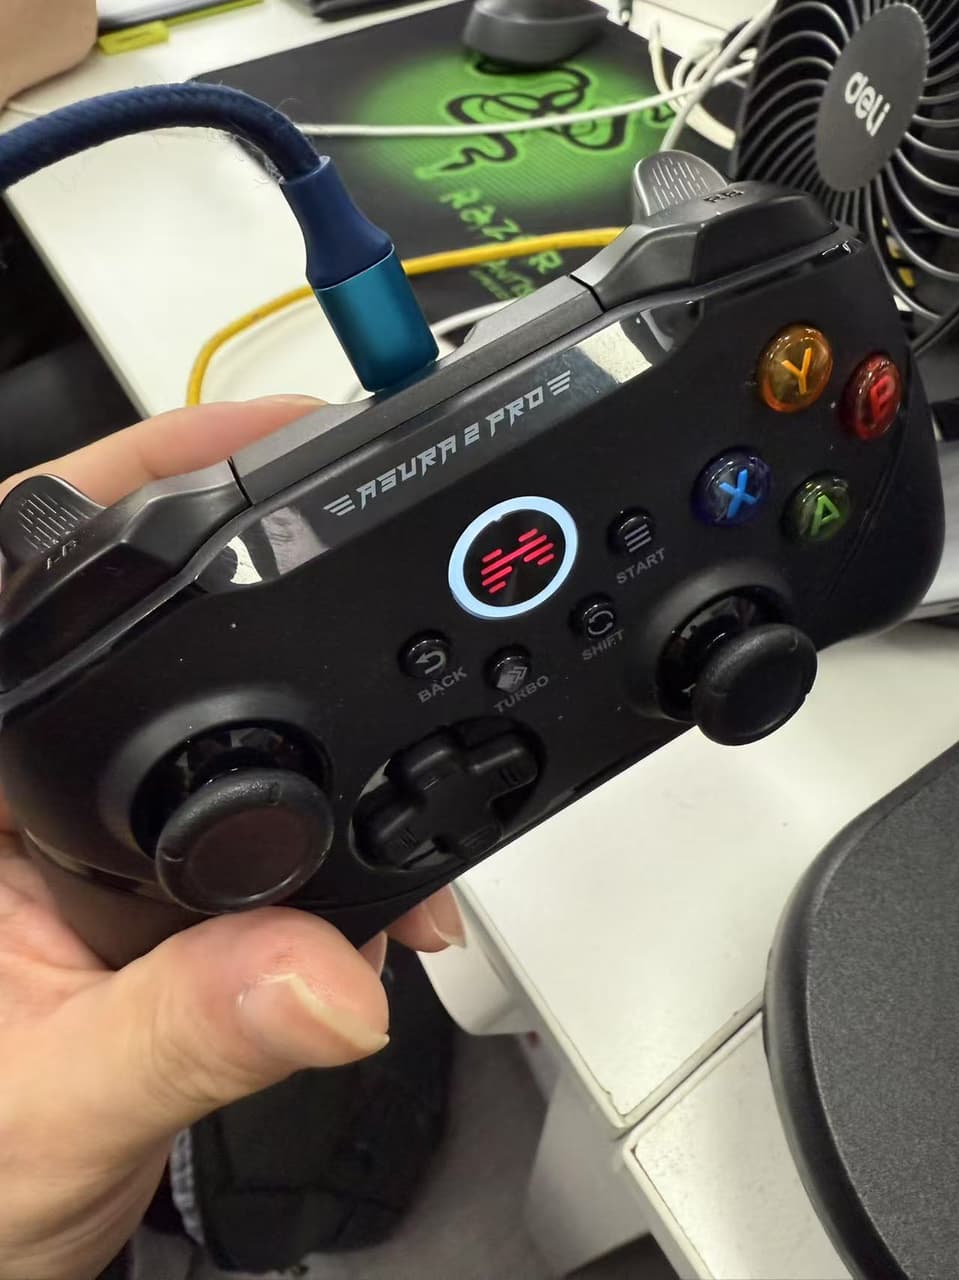
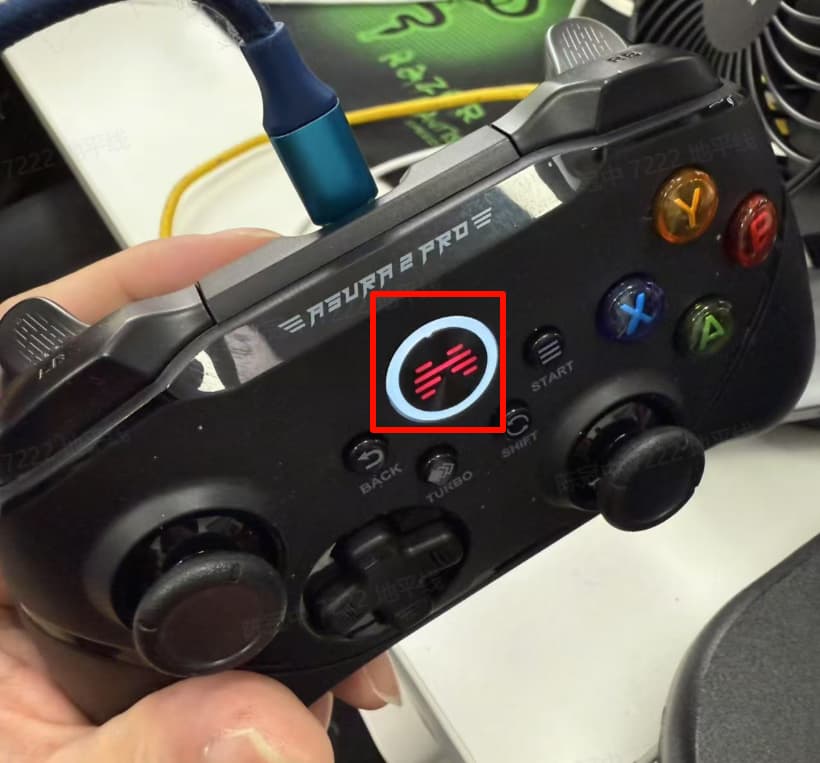
At this point, we turn on the controller and long press the middle button until you feel a vibration:
We lift the robot with one hand (this step is very important!!!), otherwise the foot motor is likely to be damaged if not lifted.
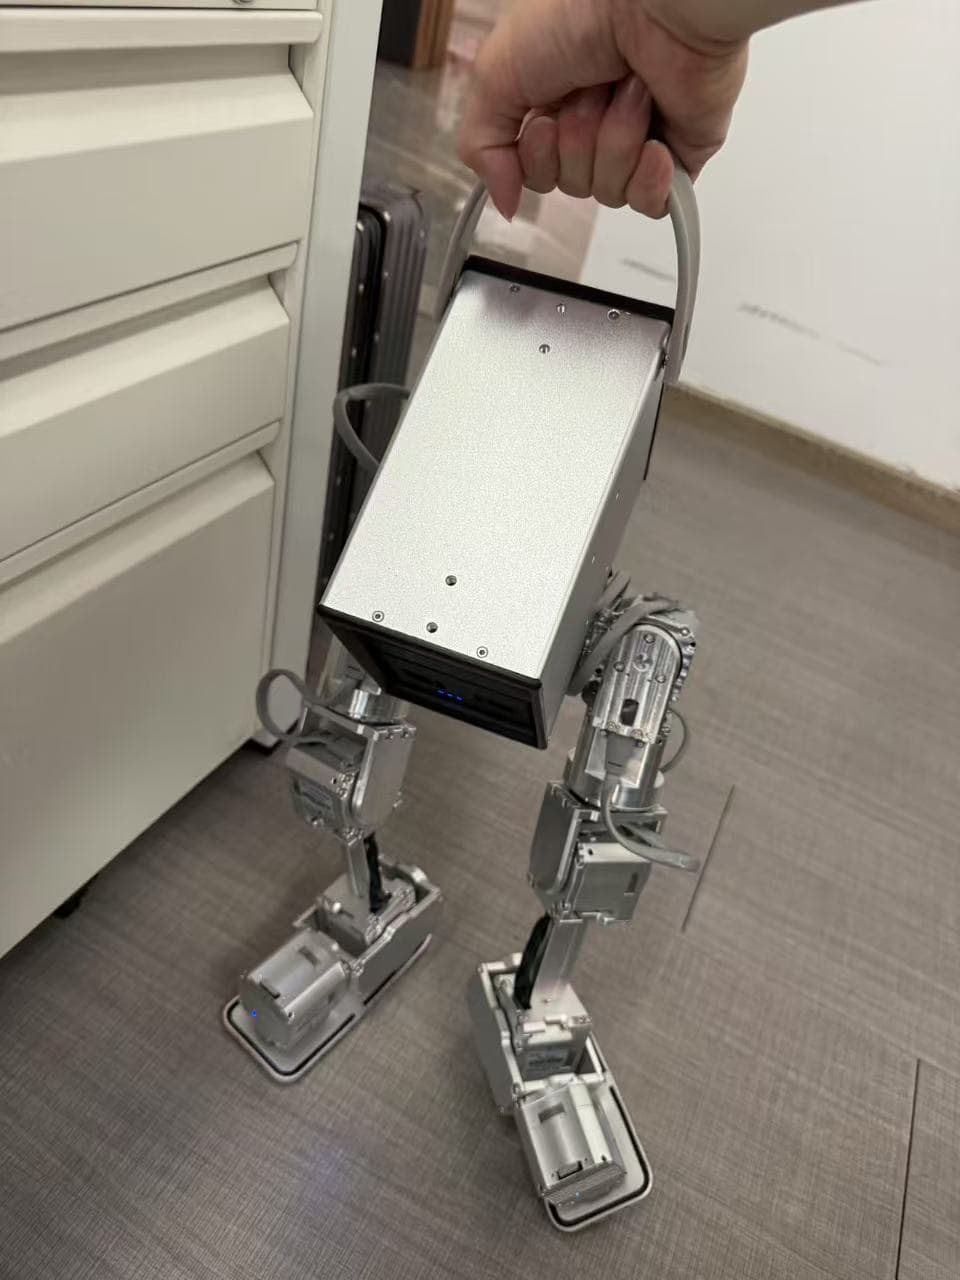
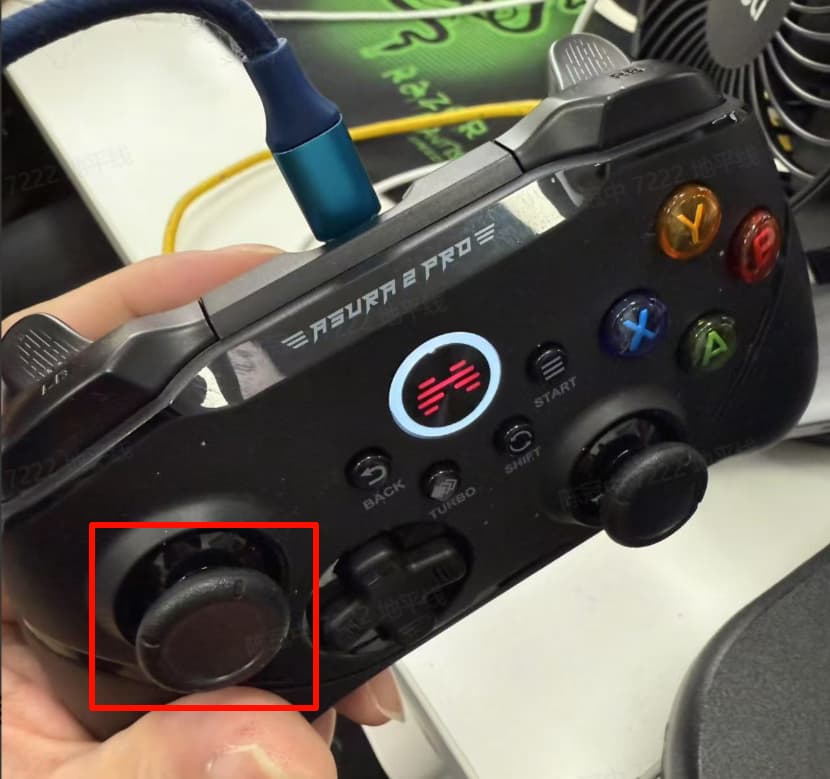
Press and hold the left button with the other hand for about 3 seconds:
At this time, the robot will control its own standing:
If the following echo is seen at this time, it indicates that standing is successful:
4.3 Bridging Topics
We open a new MobaXTerm window with IP address 172.20.10.13, username hightorque, and password ht
Enter the following command to activate ROS1:
source /opt/ros/noetic/setup.bash
Switch Directory:
cd ~/sim2real_master_dg/src
Loading bridge file:
rosparam load bridge.yaml
Reactivate ROS2 and ROS1
source /opt/ros/foxy/setup.bash
source /opt/ros/noetic/setup.bash
Startup Parameter Bridging:
ros2 run ros1_bridge parameter_bridge
If you see the following echo, it indicates that /input_data_topic and /inf_res have been successfully bridged:

4.4 S100 Inference Startup
Switch back to the S100 window of 172.20.10.2 in MobaXTerm and switch to the following directory
cd gaoqin
Activate ROS2:
source /opt/ros/humble/setup.bash
Start the program:
python main.py
Seeing the inference echo indicates that the program has started successfully:
4.5 Small Pi Walk
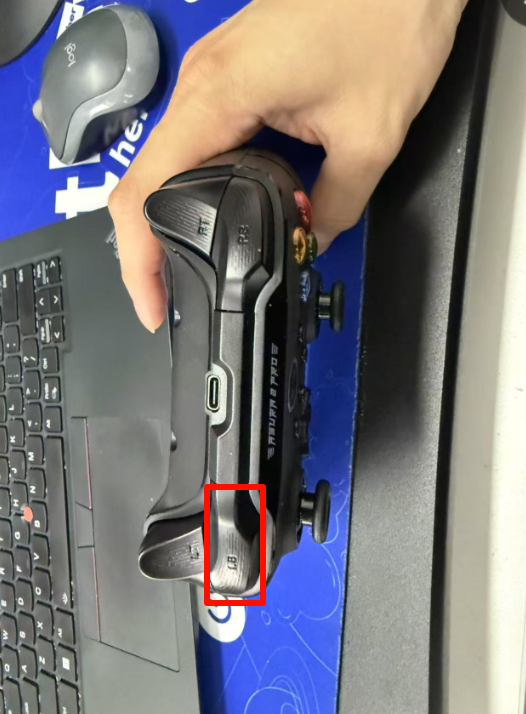
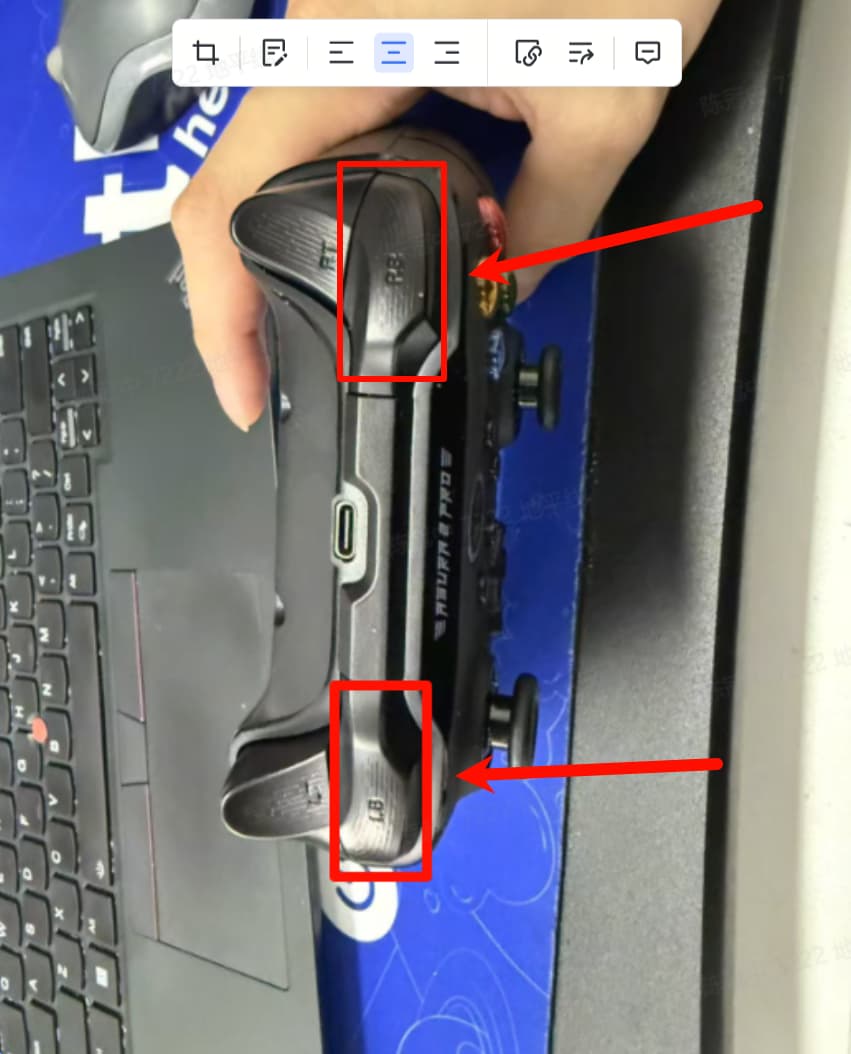
At this time, we press the LB button above the controller ( be careful not to accidentally touch the button on the back ), and Xiao Pi will start to march in place:
After starting the step, perform different actions based on the left and right joysticks:
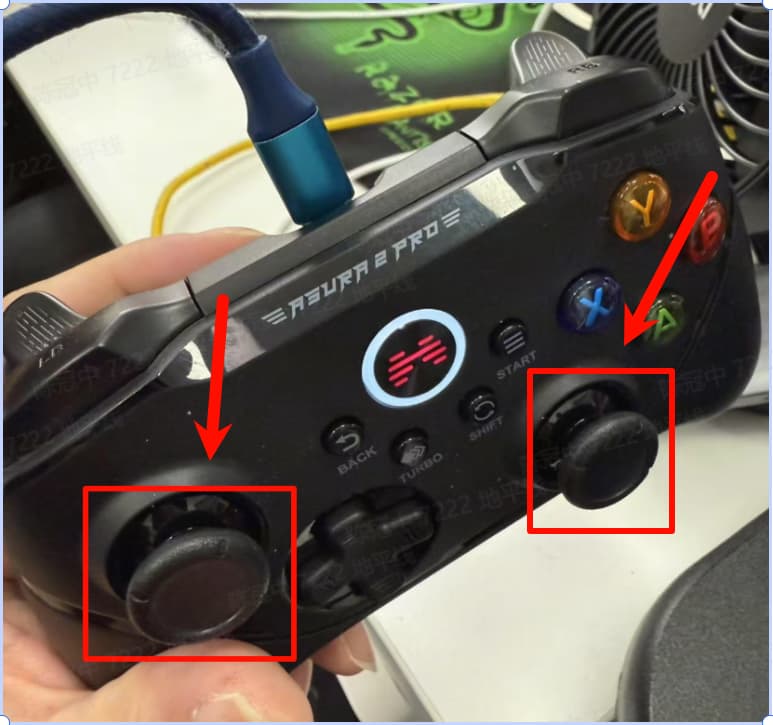
Step forward and backward by sliding the left joystick, and rotate clockwise or counterclockwise by sliding the right joystick
4.6 Small Pi Stop
Press LB + RB simultaneously, and at this time, quickly hold onto Xiao Pi to prevent it from falling
When little Pi is resting, it is recommended to squat down:
Close:
First, short press and long press the small button below, then short press the large button above.
Short press and long press the battery again until the light goes out
Model Evaluation
1. Model Introduction
This model is a regular PPO model, mainly composed of Gemm and Elu operators
2. Performance Evaluation
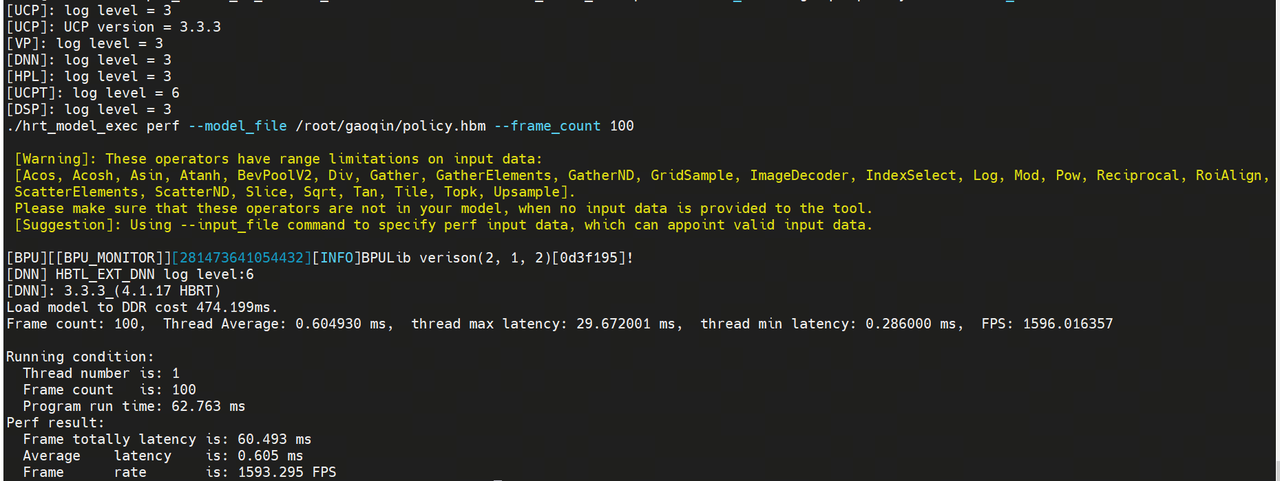
Frame Count: 100
Average Latency: 0.605ms
FPS: 1593.3
3. ION Occupancy
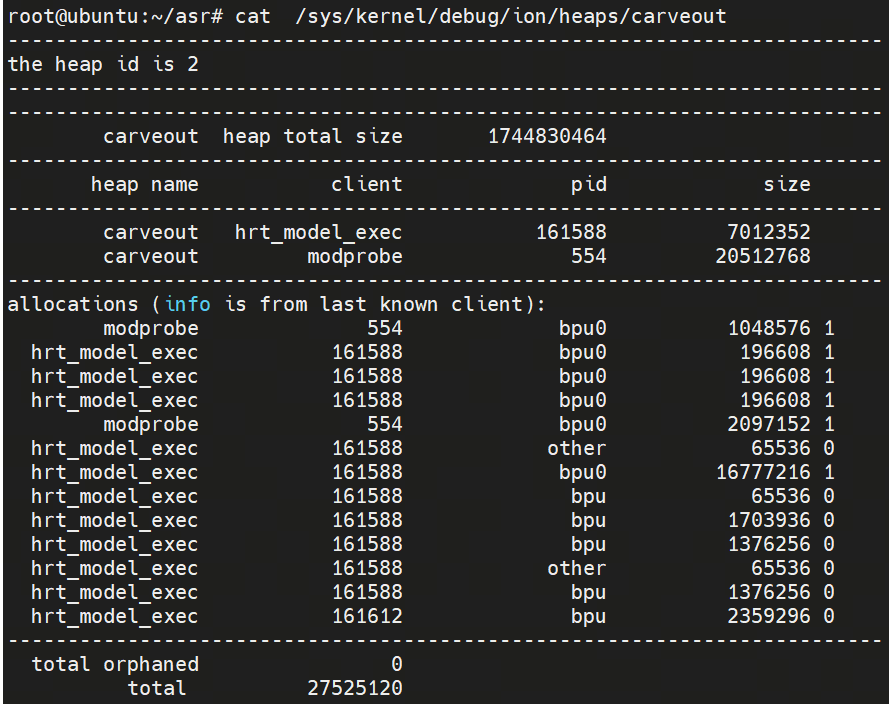
Only 26M was used