This phase is to realize the recognition and grasp of the object block. The object blocks are some cylindrical plastic buckets with different colors on the surface. The identification of the object blocks is handed over to the X3pi and USB camera, and the grabbing of the object blocks is handed over to the next machine (Arduino Mega2560) and the stepper motor and steering gear controlled by it.
First watch the final effect video (directly in the article to see this GIF card by card playback is very slow, directly pull the picture to the desktop, or save to the computer and open it is very smooth and clear)
1 Rising Sun X3 party explains the principle of object block recognition
Based on the characteristics of the target block, the solution I choose is:
First of all, the mechanical structure makes the target block appear in the fixed Angle and fixed distance of the camera every time the target block is identified. This ensures that each time the camera recognizes the object block, the object block will appear in the fixed pixel range of the shot.
Secondly, according to the characteristics of the target block (there are only color differences between the blocks), as long as the color of the pixels in the range of the target block is recognized, the specific target block can be determined. Therefore, a color recognition algorithm for pixels in a specific area is adopted.
As can be seen from the demonstration video, before grabbing the object block, the target object block is first fixed in the U-shaped push hand in front of the body through the U-shaped push hand.
It can also be seen that the fill light will fill light at this time to reduce the impact of ambient light on the recognition result.
It can also be seen from the picture that in the recognition process, the camera is directly facing the target block, and the distance is very close. This design ensures that most of the pixels captured by the camera are filled with the color of the target block, increasing the recognition area.
The image captured by the camera looks like this, and the object blocks almost fill the entire image
Then all that’s left is color recognition via the Rising Sun X3 pie
2 With the help of opencv, X3PI was used to realize the color recognition of target blocks through HSV color model; And through the serial port to identify the result sent to the next machine code principle explanation
import(s)
import cv2 as cv
import time
import numpy as np
import sys
import os
import serial
import serial.tools.list_ports
Set various parameters of the serial port, set the baud rate to 115200, and use UART3 in 40PIN
os.system('ls /dev/tty[a-zA-Z]*')
uart_dev= '/dev/ttyS3' #定义串口端口
baudrate = 115200 #波特率
ser = serial.Serial(uart_dev, int(baudrate), timeout=1)
Select Camera No. 8 for video capture
cap_follow = cv.VideoCapture(8)
There are two reasons to take a frame of an image and crop it, keeping only a small number of pixels of the target block.
1: The entire frame of the acquired image is surrounded by the surrounding environment of non-target blocks, which will affect the final recognition result if included in the calculation process
2: Reduce the size of the picture, can reduce the CPU load, improve the computing speed
Below the code is attached the picture comparison before and after the capture
ret, frame = cap_color.read()
#cv.imshow("frame", frame)
ROI = frame[50:150, 50:200]#get useful ROI
The captured image is converted into HSV color model, and three arrays are created to store the H, S and V channel values of each pixel in the HSV model image after conversion
hsv = cv.cvtColor(ROI, cv.COLOR_BGR2HSV)
#cv.imshow("hsv", hsv)
color_h = []
color_s = []
color_v = []
Each pixel in the picture converted into the HSV model is taken out, and the average is obtained after adding. The average is taken to reduce the impact of noise on the final result. Then the values of the H, S, and V channels after averaging are assigned to the new variable for the final comparison
color_h.append(np.mean(hsv[:,:,0]))
color_s.append(np.mean(hsv[:,:,1]))
color_v.append(np.mean(hsv[:,:,2]))
h = color_h[0]
s = color_s[0]
v = color_v[0]
Compare the final value and color range, determine the recognition result, and send the result to the next computer through the serial port
Explain the meaning of serial port sending characters
g——green
r——red
b——blue
B——black
w——write
e——error
The first few are the first letter of the color, and the last ‘e’ indicates that the recognized color is not in the established range
if 35 <= h <= 77 and 43 <= s <= 255 and 46 <= v <= 255:
    print('green')
    ser.write(b'g')
#red_h 10 --> 20
elif 0 <= h <= 20 and 43 <= s <= 255 and 46 <= v <= 255:
    print('red')
    ser.write(b'r')
elif 156 <= h <= 180 and 43 <= s <= 255 and 46 <= v <= 255:
    print('red')
elif 100 <= h <= 124 and 43 <= s <= 255 and 46 <= v <= 255:
    print('blue')
    ser.write(b'b')
elif 0 <= h <= 180 and 0 <= s <= 255 and 0 <= v <= 46:
    print('black')
    ser.write(b'B')
#white_v 221 --> 200
elif 0 <= h <= 180 and 0 <= s <= 30 and 180 <= v <= 255:
    print('white')
    ser.write(b'w')
else:
    print('I do not know')
    ser.write(b'e')
2 Why use HSV color model instead of RGB
Here’s why you want to use HSV images instead of grayscale or RGB
RGB is the color space we are most exposed to, consisting of three channels representing an image, namely red (R), green (G) and blue (B). Different combinations of these three colors can form almost any other color. However, the sensitivity of the human eye to these three color components is not the same. In monochrome, the human eye is the least sensitive to red and the most sensitive to blue, so the RGB color space is a color space with poor uniformity. If the color similarity is directly measured by Euclidean distance, the result will have a large deviation from human vision. For a certain color, it is difficult for us to speculate a more accurate value of three components to represent. Therefore, the RGB color space is suitable for display systems, but it is not suitable for image processing.
HSV color space is used more in image processing, which is closer to people’s perception experience of color than RGB. It is very intuitive to express the hue, vividness and brightness of the color, and convenient for color comparison.
In the HSV color space, it is easier to track objects of a certain color than BGR, and it is often used to segment objects of a specified color.
HSV’s way of representing color images consists of three parts:
Hue
Saturation of saturation
Value (brightness)
The HSV color space is represented by the following cylinder, the cross-section of the cylinder can be viewed as a polar coordinate system, H is represented by the polar Angle of the polar coordinates, S is represented by the polar axis length of the polar coordinates, and V is represented by the height of the axis in the cylinder.
a
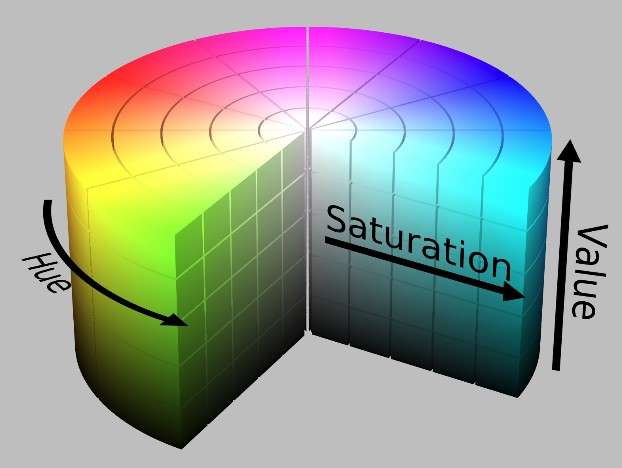
Hue is measured by Angle. The value ranges from 0 to 360 degrees. It indicates the color information, that is, the position of the color in the spectrum. , expressed as follows:
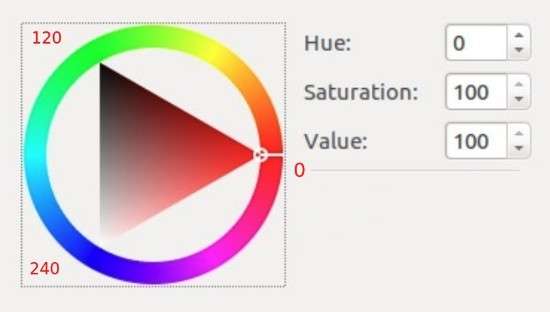
All the colors on the color ring are colors on the spectrum, starting with red and rotating counterclockwise, Hue=0 for red, Hue=120 for green, Hue=240 for blue, and so on.
In GRB, color is determined by three values, such as yellow (255,255,0); In HSV, yellow is determined by only one value, Hue=60.
Cross section of half side of HSV cylinder (Hue=60) :
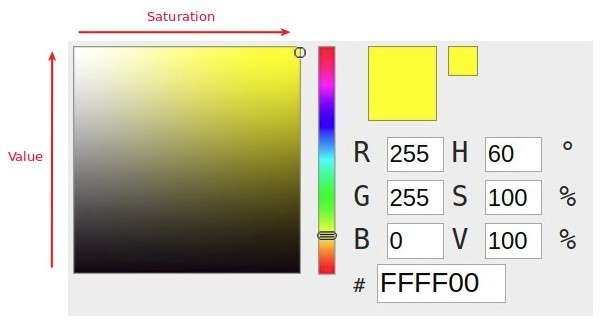
Where the horizontal direction indicates saturation, and saturation indicates the degree to which the color is close to the spectral color. The higher the saturation, the darker the color, the closer it is to the spectrum. The lower the saturation, the lighter the color, the closer it is to white. Saturation of 0 indicates pure white. The value ranges from 0 to 100%. The larger the value, the more saturated the color.
The vertical direction indicates the brightness, which determines the degree of brightness of the color in the color space. The higher the brightness, the brighter the color, and the range is 0-100%. A lightness of 0 indicates pure black (when the color is darkest).
It can be commonly understood as:
When Hue is certain, the saturation decreases, that is, white is added to the spectral color, and the proportion of the spectral color also decreases. The saturation decreases to 0, indicating that the proportion of the spectral color is zero, resulting in the entire color appearing white.
The brightness decreases, that is, black is added to the spectral color, and the proportion of the spectral color is also decreasing, and the brightness decreases to 0, indicating that the proportion of the spectral color is zero, resulting in the entire color showing black.
HSV is a relatively intuitive color model for users. We can easily get a single color by specifying the color Angle H and letting V=S=1, and then get the color we want by adding black and white to it. Increasing black decreases V without changing S, just as increasing white decreases S without changing V. For example, to get dark blue, V= 0.4S =1 H=240 degrees. To get a light blue color, V=1, S= 0.4H =240 degrees.
The stretch contrast enhancement of HSV is to min-max normalize the two components of S and V, and H remains unchanged.
RGB color space is more oriented to industry, while HSV is more oriented to users, most of the image recognition will use HSV color space, because HSV color space is more intuitive expression!
3 The lower computer controls to grasp the object block action
The lower machine is responsible for the control of all robot actions, including straight line driving, turning, turning, grabbing and placing of the object block, etc. Here, the grabbing action of the object block is explained first.
First look at the mechanical design, the cylindrical belt drive on the front of the robot is powered by two actuators, the first is this steering gear (in blue)
The steering engine provides power to control the opening and closing of the gripper, which is used to grab the target block and release the target block
A 42-step motor controls the conveyor belt and thus controls the gripper, which is used to raise and lower the gripper
As you can see from the video, it takes five movements to grab each block
1. Drop gripper to half height
2. Open your grip
3. Drop grip to the lowest point
4. Close the gripper and grab the block
5. Raise the gripper to its highest point
Finally, the action code is explained
First of all, if you want to learn the control of steering gear and stepper motor, there are many master control schemes to choose. The Arduino platform is chosen here because the design time is relatively urgent at the beginning, so I chose this master control because the development of Arduino is more time saving, and just because the performance of this single chip microcomputer is up to the standard, I chose it. However, at present, most of the competitions are selected STM32, here it is selected according to your actual situation
The next part of the code because it is not about the rising sun X3 pie, it is not a explanation, it is about the overall action control, if you want to understand the detailed code meaning, you can refer to the following Taiji maker out of the relevant tutorial and explanation
Main part of code
Import the required library, create the steering gear, stepper motor objects
#include <AccelStepper.h>
#include <Servo.h>
AccelStepper stepperArm(1,armstepPin,armdirPin);
Servo armServo;
Initialize the steering gear and stepper motor in the setup function
  stepperArm.setMaxSpeed(1200.0);
  stepperArm.setAcceleration(400.0);
  armServo.attach(8);
  armServo.write(servoMid);
Grab action Control (five steps)
void Get(){
  if (getTurns == 0){
    stepperArm.moveTo (armStepperHigh1);
    //Serial.println("我是抓手,我现在在下降");
    if (stepperArm.currentPosition() == armStepperHigh1){
      getTurns ++;
    }
  }
  if ( getTurns == 1){
    for (armAngle = servoMid; armAngle <= servoEnd; armAngle ++) {
      armServo.write(armAngle);
      delay(5);
      }
    getTurns ++;
  }
  if (getTurns == 2){
    stepperArm.moveTo (armStepperHigh2);
    if (stepperArm.currentPosition() == armStepperHigh2){
      getTurns ++;
    }
  }
  if ( getTurns == 3){
    //delay(2000);
    for (armAngle = servoEnd; armAngle >= servoMid; armAngle --) {
      armServo.write(armAngle);
      delay(5);
      }
    getTurns ++;
  }
  if (getTurns == 4){
    stepperArm.moveTo (armStepperHigh0);
    if(stepperArm.currentPosition() == armStepperHigh0){
        getTurns = 0;
        ifOverGet = 1;
      }
    }

}