Introduction
Controlling bipedal robots has always been a notoriously difficult engineering challenge. The high-dimensional, under-actuated, and non-linear contact dynamics mean that every step is a balancing act. Traditional model-based control methods perform adequately in structured environments, but their robustness often crumbles when facing model parameter deviations or complex terrains.
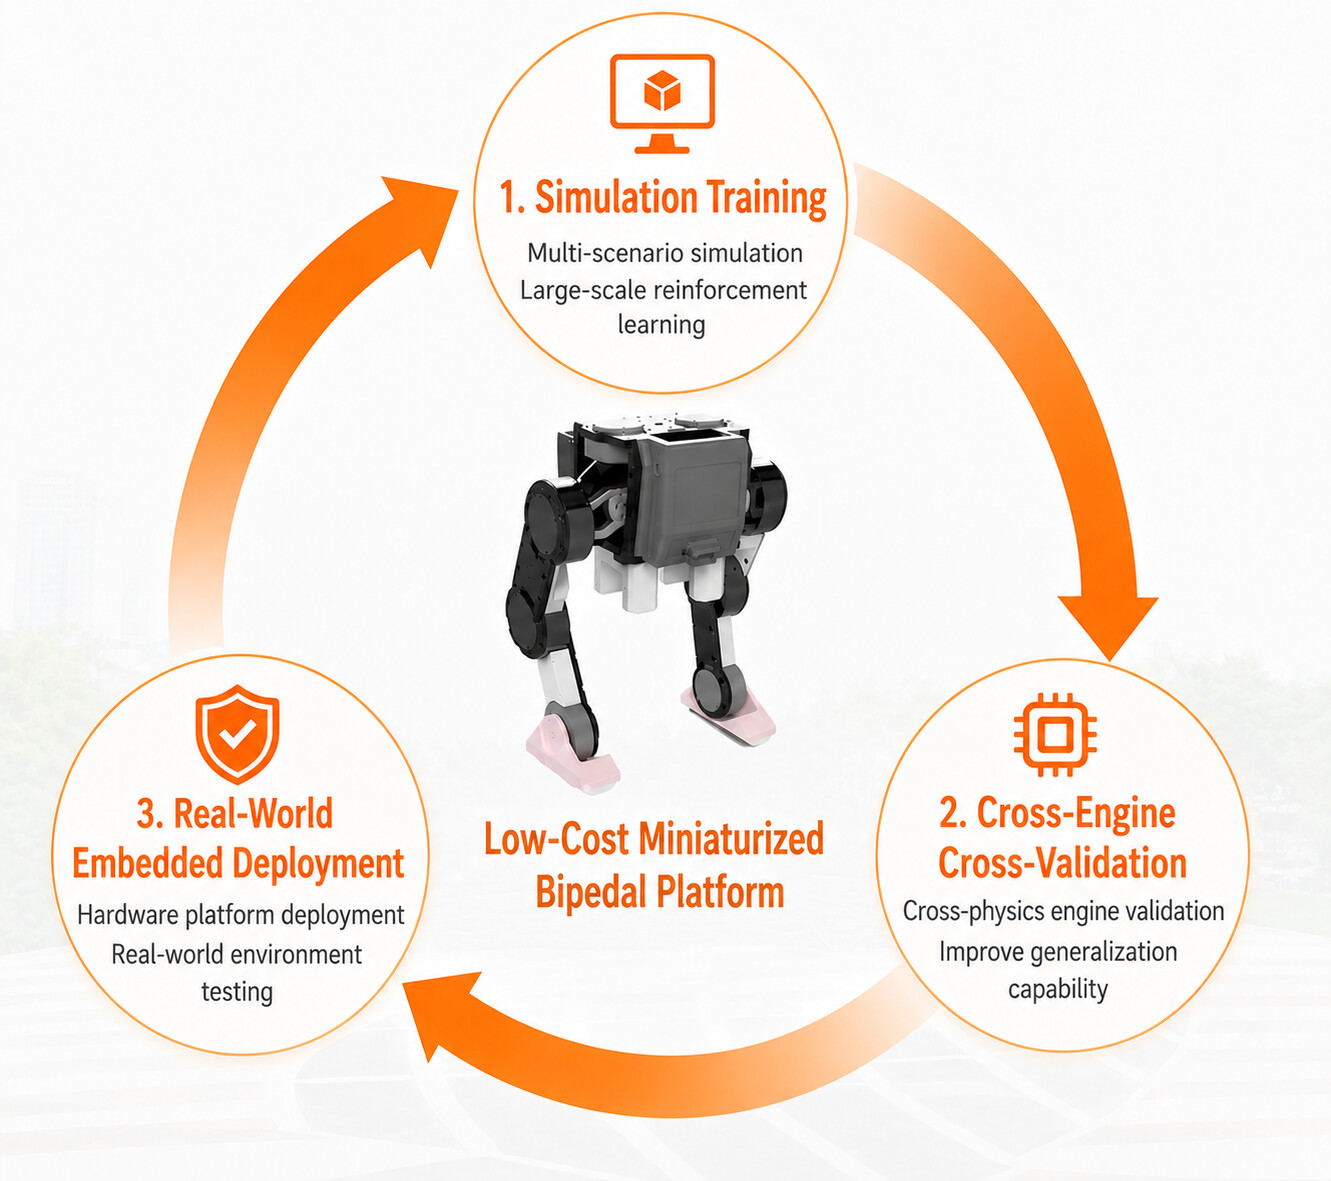
Today, I am open-sourcing this low-cost, miniaturized 10-DOF bipedal robot solution. Let’s explore our full-stack workflow: training Reinforcement Learning policies on GPU, validating them across engines, and finally leveraging the RDK X5’s edge-computing power to deploy the models directly to the physical robot.
System Architecture
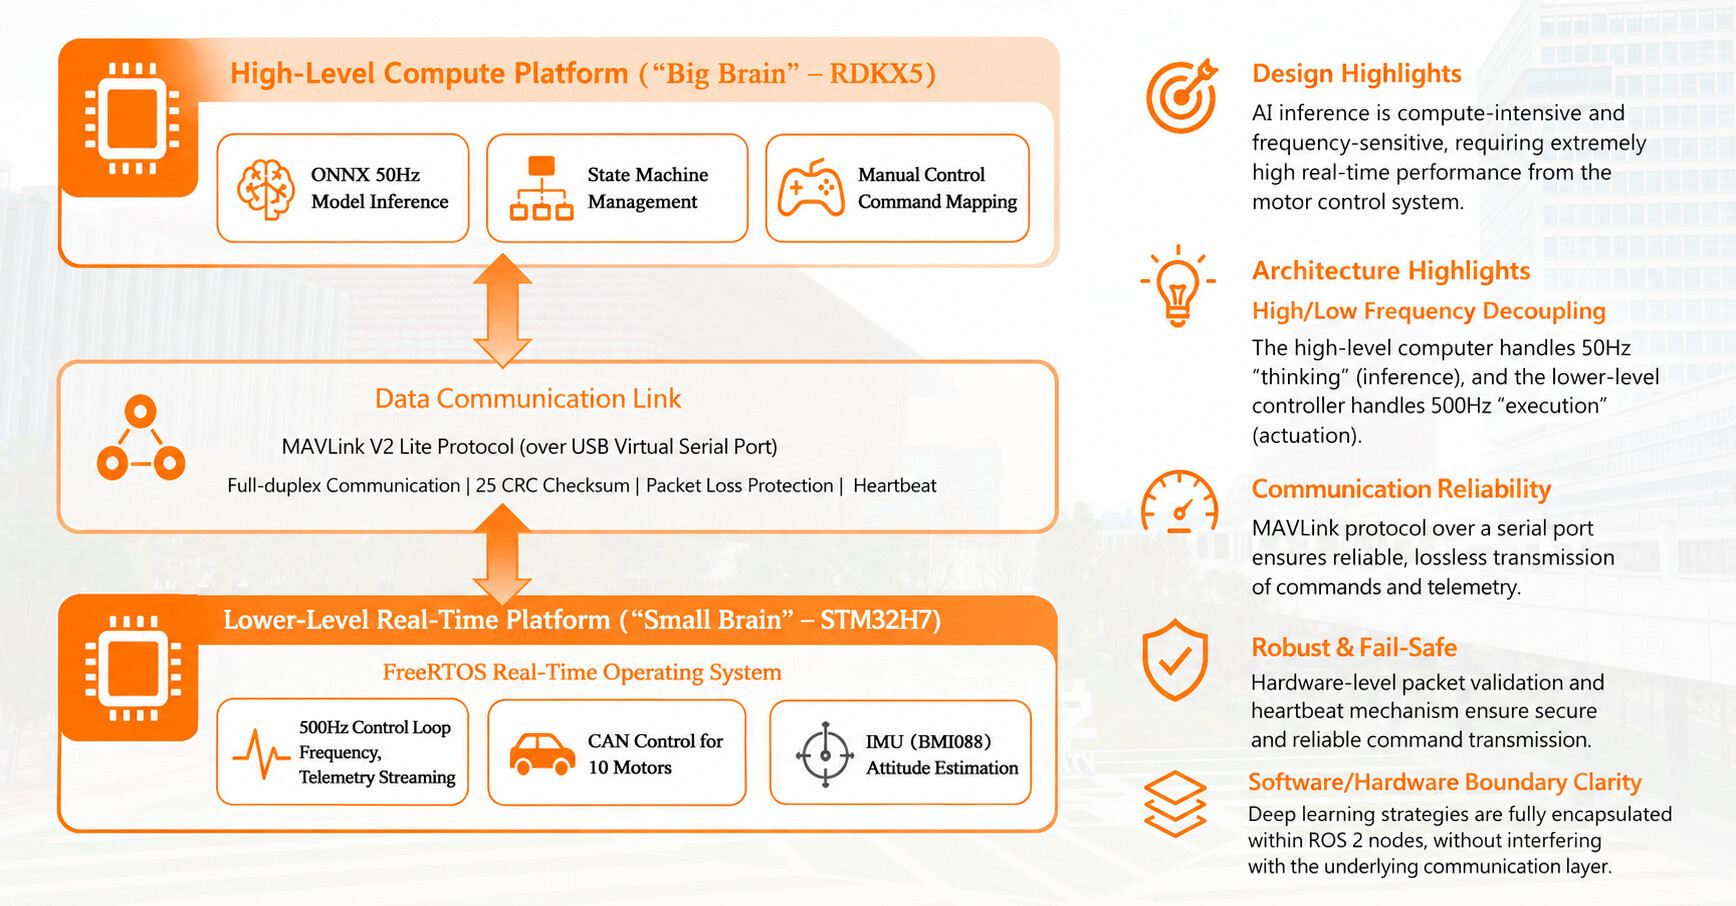
To handle massive neural network policy inference on the edge while ensuring high-frequency real-time control of the actuators, cramming everything into a single compute board is a recipe for disaster. Therefore, we adopted a deep hardware-software decoupled architecture:
-
The Brain (RDK X5): The compute powerhouse. Running ROS 2 (Humble), it handles neural network forward inference at a stable 50Hz and manages the global state machine.
-
The Cerebellum (STM32H7): The real-time vanguard. This FreeRTOS-based control board is dedicated entirely to high-frequency PD closed-loop motor control and lightning-fast IMU attitude solving.
-
Zero-Packet-Loss Comms: We ditched standard serial protocols and adopted the MAVLink protocol over a full-duplex USB virtual serial port. Thanks to MAVLink’s strict X.25 CRC checks, we completely eliminated the packet sticking and frame drop issues common in standard USB serials, ensuring absolute reliability.
Mechanical Design

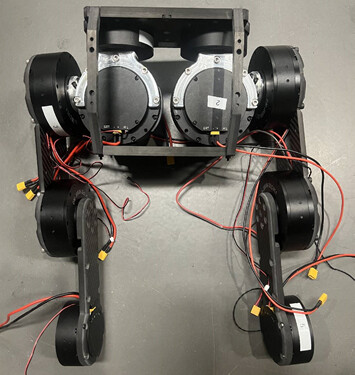
Drawing inspiration from the excellent open-source OpenLoong (Qinglong) project, we optimized the mechanics specifically for RL-based gaits. It features a lower-body-only configuration with 10 active DOFs, keeping the total weight strictly around 8kg.
-
Inverted Mass Distribution: To maximize gait agility, the 24V battery, STM32 board, and the RDK X5 are all packed into the waist and torso. The distal ends of the legs only contain essential linkages and motors, drastically reducing the swing leg’s rotational inertia for ultra-fast high-frequency stepping.
-
Core Power Distribution: The Hip Roll, Hip Pitch, and Knee joints bear the heaviest loads, so we equipped them with Damiao DM-J8006-2EC high-torque motors. For the lightweight extremities (Hip Yaw and direct-drive Ankle Pitch), we opted for the compact DM-J6006-2EC motors.
-
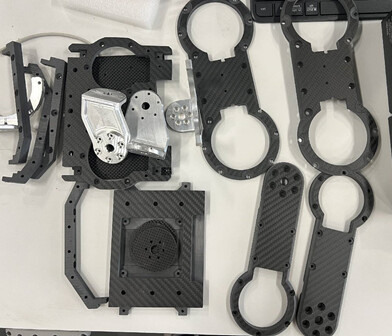
Hybrid Manufacturing: We used aerospace-grade aluminum (CNC) for load-bearing transmission joints, carbon fiber plates for thighs/calves to balance stiffness and weight, and 3D printing for non-load-bearing shells. It’s highly rigid and cheap to iterate!
Software Deployment: ROS 2 on the RDK X5
The RDK X5 acts as the central nervous system. By isolating the AI inference into an independent node, we ensure complex math never interferes with low-level communications.
![]() Edge ROS 2 Repo: legged-robot-ros2
Edge ROS 2 Repo: legged-robot-ros2
![]() Quick Start Guide:
Quick Start Guide:
# 1. Build the workspace
cd ~/legged-robot-ros2/
colcon build --symlink-install
# 2. Launch the hardware bridge (MAVLink comms)
ros2 launch robot_bringup bridge.launch.py
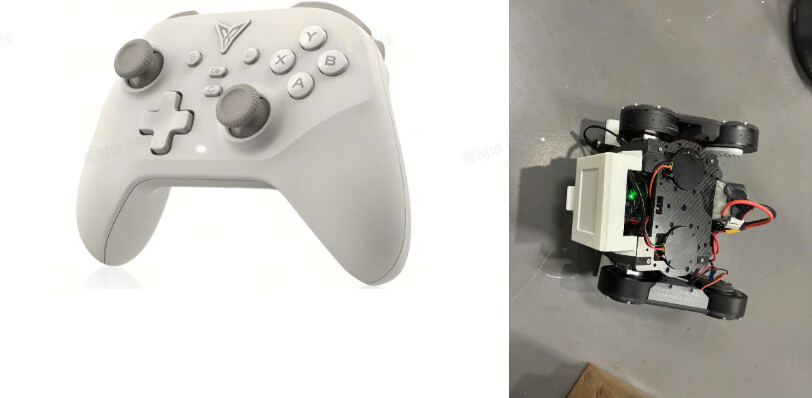
# 3. Launch AI Inference & Controller (Requires Flydigi Gamepad)
ros2 launch robot_control robot_control.launch.py
-
Topic Routing: The AI publishes a 10-length array of target angles to
/motor_cmdsat 50Hz, which is bridged to the STM32. It simultaneously subscribes to/joint_statesand/imu/datafor real-time neural network observations. -
Swapping Your Own Models: Trained a new
.onnxmodel? Simply drop it into therobot_controldirectory, update themodel_pathin the robot_control.launch.py launch file, and you’re ready to test! -
Zero Calibration (
/set_zero_cmd):-
For example: I need to calibrate ID 5.
-
ros2 topic pub --once /set_zero_cmd std_msgs/msg/Int32 "{data: 5}" -
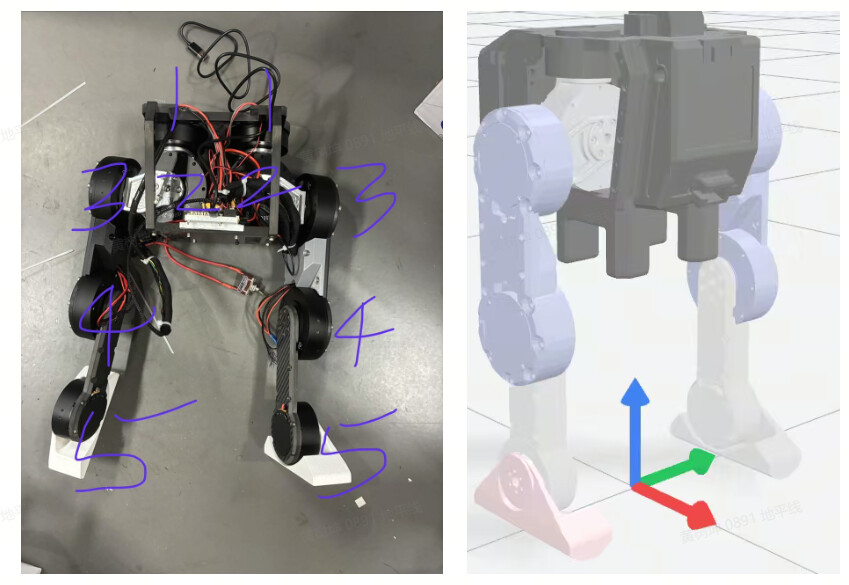
The program motor IDs are shown in the figure below, and the sequence is consistent with the motor sequence output by the reinforcement learning inference. The robot’s zero-point position needs to be consistent with the URDF zero-point position. The ID sequence and the robot’s zero-point position are shown in the figure below:
-
Standby & Startup Sequence:
-
First, manually pose the robot into the initial position as shown in the image above.
-
Press A on the controller. Wait and observe until the robot moves into its default crouching posture.
-
While physically supporting the robot with your hands, press A one more time. You will see the robot stand up. (Note: At this stage, the robot is simply moving to fixed joint values and has NOT yet entered the AI inference mode).
-
Once the robot is standing securely, press B to activate the model inference mode.
-
You’re all set! Now you can push the joystick to watch your robot walk!
Embedded Deployment
For the lower-level execution, we use the DM-MC02 Damiao STM32 Dev Board (featuring an onboard BMI088 IMU). It is physically isolated from the brain, acting as the ultimate safety watchdog.
How to buy:https://www.ebay.com/itm/286738156962
![]() Embedded Code Repo: legged-robot
Embedded Code Repo: legged-robot
-
IDE Setup: I highly recommend using CLion. Follow the Baud Dance Docs to configure ArmGCC and OpenOCD for a seamless compile-and-flash experience.
-
Damiao Motor Config :


-
Set Current Bandwidth to 2000 for high-frequency dynamic response.
-
CAN IDs should be sequential (
0x01, 0x02, etc.). -
Master IDs (feedback messages) must replace the leading
0with1(e.g.,0x11, 0x12). -
Wiring Scheme: Purchase two power distribution boards. Route CAN1 exclusively to the Right Leg, and CAN2 exclusively to the Left Leg. This physical bus isolation prevents signal congestion! (Pro-tip: Use nylon winding tubes for clean cable management.)

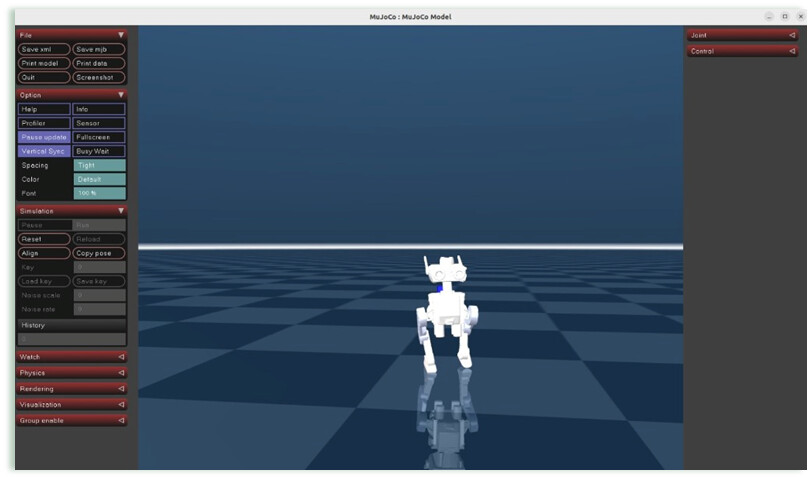
Reinforcement Learning: Isaac Gym Simulation
With the system architecture locked in, the final piece is the algorithm. The core training happens entirely within NVIDIA’s Isaac Gym massive parallel simulation environment, with MuJoCo cross-engine validation to minimize the Sim2Real gap.
Full RL Repo: legged-robot-RL
Environment Setup:
# Clone the main repo
git clone https://github.com/shockley6668/legged-robot-RL

# Install PyTorch 1.10 + CUDA 11.3 (Strict version requirement)
pip3 install torch==1.10.0+cu113 torchvision==0.11.1+cu113 torchaudio==0.10.0+cu113 -f https://download.pytorch.org/whl/cu113/torch_stable.html

# Install Isaac Gym Preview 3 (Preview 2 is incompatible!)cd isaacgym/python && pip install -e .

# Install core RL libraries (rsl_rl & legged_gym)
git clone https://github.com/leggedrobotics/rsl_rl
cd rsl_rl && git checkout v1.0.2 && pip install -e .
git clone https://github.com/leggedrobotics/legged_gym.git
cd legged_gym && pip install -e .
From Training to Export:
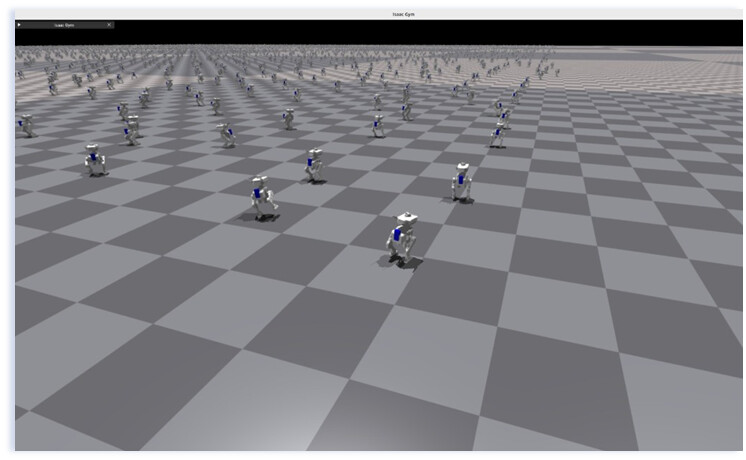
# 1. Headless massive trainingcd legged-robot-RL
python train.py --headless

# 2. Cross-engine validation (Test generalization in MuJoCo)
python play.py

# 3. Sim2Sim debugging and verification
python sim2sim_tinker.py --load_model ./modelt.pt
# (Or verify the ONNX: python sim2sim_tinker.py --load_model ./modelt.onnx)# 4. One-click ONNX export (Automatically handles checkpoints and state_dicts)
python export_onnx.py --input ./modelt.pt --output ./modelt.onnx
The Final Result

Thanks to the robust Domain Randomization applied during the Isaac Gym training, combined with the ultra-low latency execution of the RDK X5 + STM32 architecture, the Sim2Real transfer is incredibly smooth. Once you hit that ‘B’ button to engage the AI, the robot exhibits impressive dynamic stability. It tracks joystick velocity commands fluidly, continuously adjusts its foot placement to maintain balance, and handles minor external disturbances with resilience.
Conclusion
From writing the first line of code to seeing the RDK X5 drive this machine to take its first real-world steps, the journey has been incredibly challenging but rewarding. If you’re interested in the specifics of the Reward Functions, our Domain Randomization strategies, or hardware selection details, drop a comment below! Let’s discuss it in the open-source community!
Let’s connect:
-
Discord: 🤖D-Robotics Community
-
Email: shukun6668@gmail.com
-
WhatsApp: +44 7729 523777